Pages

Friday, 28 February 2014

Making a Reversible Two Colour Scarf for any Weight of Hand Spun Yarn


Last Autumn, I bought some more Polwarth fleece from Widow Twanky and carded it half and half with Dorset Poll fleece.  This spun up very nicely.  I Navajo three plied substantial singles, til I had two skeins of chunky weight yarn, each about 70m long.  The Polwarth is silky soft, the Dorset Poll bouncy.  The combination yarn seemed spot on for a winter hat.  When I pulled up the dying coreopsis plants in November, I didn't want to waste any dye still in them, so these skeins were mordanted with alum, then simmered with roughly chopped stems and leaves.  Though the bronze colour was warm and pleasing, I couldn't think who it might suit.  The yarn got set aside in the Christmas project rush.

Titting about with woad in January, the two skeins fell victim to two vats.  They got dipped with rather different results.   My brother's birthday falls at the beginning of March and since he is a ginger, I thought the green colours would look good on him. Trial on 6mm needles, planned a striped scarf, thought, oh too dull, I can deal with a bigger challenge than that these days.  

How pride does come before a fall.

Searching through possible patterns on Ravelry, I found The Harmonic Hologram.  It was hot off the press newly released and looked so much more interesting a way to use two colours than just knitting stripes.  Better still, the pattern is adaptable to any weight of yarn and desired scarf size.  Best of all, a quick knit - 10 Hours or Less.  Should be able to knock that up, wash and dry and get it in the post in plenty of time.


With only a limited amount of wool, I decided to knit the pattern as written, accepting that my version would come up narrower and shorter.  Three false starts frogged, I wrote Thursday off to experience.  Friday, I managed two whole pattern repeats, though not without error.  Keeping an eye on the Wales v France game was not good for my concentration. Our son rang half way through.  I was chatting quite happily til the phone was snatched from me and himself hurled some vernacular down the line. Son squawked 'Don't tell me the score  .. ' and hung up.  Dark mutterings on the ill effects on our offspring of living out there among the English.  I pointed out that while he had survived his own stint across the border and come home with a lovely English wife, that could change.
Settled in by late afternoon on Saturday, I watched the thrilling last minute Scotland victory and a cracker of a game between England and Ireland  and still managed to make much better progress.  I didn't need the pattern any more by Sunday.  Once you have the hang of this reversible stitch, it becomes obvious what the next row has to be and much quicker to spot mistakes.  All in all, I have to admit it took me much more than ten hours to make. 

I am well pleased to have learned this reversible stitch.  It makes a thick fabric, good and warm for a scarf.  I'd think it would be sturdy and decorative for other applications.  The pattern includes a method and a table for calculating how to use any yarn on any needle to make a piece the size required.  So nice to have a pattern suitable for hand spinning. The majority relish giving portents of doom for those reckless souls who neglect to buy their specified brand of wool.  One to remember for future yarns.


Good to feel spring is in the air. Most of the weekend was spent outdoors. This has been the first time in months that I've got much done in the garden.  The borders all badly need clearing, but with two done, the remainder is less overwhelming. Took a chance on the exceptionally mild weather and planted out some autumn sown weld plants.  The greenhouse has been quietly growing mould, til himself got the pressure hose out.  Now it is ready for seed trays and the 2014 dye plants. 
The front garden may be squelchy with rain, but the croci have multiplied.  Far too welcome a sight to be picked for dye, though I have read that purple petals will give blue.

Friday, 21 February 2014

Banquo Drape Cardigan Pattern

It is a sad moment when you realise that a much loved cardigan is no longer fit for work.  I have been wearing one such for rather too long.  Finally noticing its stretched and pilled fabric, I wondered how come I wore it so much more than the others. Pulling it back on one last time, I saw how it narrowed my shape.  I have wide shoulders and a broad back.  During the 80's, all those shoulder pads made me look like I was off to play American football.  
I think my square physique was softened by the wide collar, dropped sleeves and a top seam that runs behind the the shoulder.  I've been looking for a drape shape pattern for my alpaca/Jacob spinning.  This cardi wasn't perfect, the machine knit stocking stitch had no binding, so the edges have always been curly, plus it was just too short to keep the draft off my arse.  Instead of the recycling bin - away to the laboratory for dissection.  I cut it up, measured the pieces and worked out this cloned pattern, adding my own genetic modifications. 


Materials

4mm knitting needles
12 x 50g balls double knitting wool (130m per ball)
darning needle for sewing up

Tension

In stocking stitch, 20 stitches and 28 rows = 10cm2 after putting the swatch through a machine wool wash.  Washing always changes the original knitting dimensions of my homespun wool and I found the high percentage of alpaca in this yarn shrank similarly. After washing, the width got a tiny fraction wider and the length reduced by 12%. 


Instructions are for one size only - large.  The diagram shows the finished, washed sizes of each piece.  Where the instructions give a target length to knit, there is a reminder to future self to adjust this (approximately) for the shrinkage expected from a different yarn.

Pocket Linings

Cast on 25 stitches and work in stocking stitch til the length is 14cm (+12% = 15.5cm) finishing on a right side row.  Make two and save on a spare needle.

Right Front

Cast on 85 stitches.  Work 6 rows of knit 1 purl 1 [k1p1] seed stitch to make the bottom border.
Row A (k1p1) for 20 stitches then k 65.
Row B p 64 stitches (k1p1) for 20 stitches k1
Repeat rows A and B til work measures 19cm (+12% = 20.5cm)

To make the pocket edge
Row C (k1p1) for 20 stitches, k 9 then (k1p1) for 24 stitches and k 31
Row D p 31 then (k1p1) for 24 stitches, k1 p8 then (k1p1) for 20 stitches k1
repeat rows C and D one more time
Next row - (k1p1) for 20 stitches, k8, cast off 25 stitches in k1p1 and k31
To add in pocket lining, p31, purl across the 25 stitches of a pocket lining piece, then on the main piece p8 and  (k1p1) for 20 stitches k1.

Repeat rows A and B til work measures 45cm (+12% = 51cm)
On final purl row, cast off first 6 stitches (leaves 79 stitches)

To form armhole shape
Row E (k1p1) for 20 stitches then k to last 4 stitches, knit 2 together [k2tog] k2
Row F purl to last 21 stitches, (k1p1) for 20 stitches k1
Work rows E and F 10 times in total (leaves 69 stitches)
Continue straight up without any more reductions, keeping front border seed stitch pattern going, until armhole measures 24cm (+12% = 27cm).  On last purl row, cast off 14 stitches, which will be the shoulder seam (leaves 55 stitches).
Continue in pattern, making the collar until it measures 14cm (+12% = 15.5cm).  Cast off.  Sew pocket lining to back of work.


I am a late convert to blocking - that is, washing pieces of knitting and pinning them out flat to dry. Once I had made the right front, I was anxious to make sure I had calculated the shrinkage correctly. Also,  I was worried the clever idea of doing a wide seed stitch front edging had come up shorter than the stocking stitch, warping the fabric.  I pinned it out flat while damp, lightly with no real tension. It dried pretty much the size and shape I planned, as shown here with the unwashed left front. 


Left Front

As for Right Front, with the following reversals.  
Left Row A knit 65 (p1k1) for 20 stitches
Left Row B (k1p1) for 20 stitches, k1 p 64

To make the pocket edge
Left Row C k31 (p1k1) for 24 stitches k10 (k1p1) for 20 stitches
Left Row D (k1p1) for 20 stitches k1 p9 (k1p1) for 24 stitches k1 and p31
Next row - k31, cast off 25 stitches in k1p1 and k10 (p1k1) for 20 stitches.
To add in pocket lining, (k1p1) for 20 stitches k1 p9, purl across the 25 stitches of a pocket lining piece, then on the main piece p30.

Repeat left rows A and B til work measures 45cm (+12% = 51cm)
On final knit row, cast off first 6 stitches (leaves 79 stitches)

Left Row E k2 slip1 k1 pass slipped stitch over [psso] k55 (p1k1) for 20 stitches
Left Row F (k1p1) for 20 stitches k1 purl to end
When armhole measures 24cm (+12% = 27cm), cast off 14 stitches at the beginning of the next knit row before finishing as for Right Front.

Back

Cast on 95 stitches. Work 6 rows of knit 1 purl 1 seed stitch to make the bottom border.
Continue in stocking stitch til work measures 45cm (+12% = 51cm).  
To shape armhole
Cast off 6 stitches at the beginning of the next two rows (83 stitches remain).
Row G k2 slip1 k1 psso knit to last 4 stitches k2tog k2
Row H Purl
Repeat rows G and H three times in total (77 stitches remain).
Continue straight up in stocking stitch without any more reductions, until armhole measures 16cm (+12% = 18cm).  
To make angled shoulder seams, repeat rows G and H eight times in total (61 stitches remain). 
Cast off.

Sleeves

Cast on 51 stitches.  Work rows of knit 1 purl 1 seed stitch to make the cuff 10cm deep (+12% = 11cm).  Knit one row, purl one row.
On the following row and every tenth row thereafter, increase as follows:
Knit 2, make one right, knit to last 2 stitches, make one left, knit 2.
After nine increase rows, stitch count = 69.
Continue in stocking stitch until sleeve measures 42cm (+ 12% = 47cm), finishing on a purl row.

Cast off 6 stitches at the beginning of the next two rows (57 stitches remain).
Shape the top of the sleeve by reducing on the next 18 right side rows as follows:
Knit 2, slip 1 k1 psso, knit to last 4 stitches, k2tog k2 (21 stitches remain)

You are now on a wrong side row. For Right Sleeve, shape top as follows:
Purl to last 2 stitches, p2tog.
K2tog, knit to last 4 stitches k2tog k2
Repeat until 11 stitches remain, k2tog and cast off.

For Left Sleeve, shape top as follows:
P2tog, purl to end of row
k2, slip 1 k1 psso, knit to last 2 stitches and k2tog.
Repeat until 11 stitches remain, cast off, knitting last 2 stitches together.


To Make Up

Sew the top of the two front pieces together, forming the back midline of the collar.

Lay out the joined front pieces with the top edge of the back panel matching the base of the collar and pin its angled edges along the 14 cast off stitches on each side.  Sew together from the end of the shoulder seam, across the back and down the other shoulder seam.


Make sure you are fitting each sleeve to the correct side of the cardigan.  Pin the 6 cast off stitch edge on either side of the sleeve top to the matching 6 stitch cast offs at the bottom of the armhole shaping on front and back pieces. Pin the shaping of the sleeve top into the armhole, remembering that the shoulder seam is not central, but further back along the curve.  Sew into place.  

Seed stitch on cuffs and front border mean that they are pretty from both sides. Hopefully, the seed stitch edging at the bottom and along the pocket tops will stop them curling up.

I've been wearing it to work and it is exactly what I like in a cardigan.  The yarn is soft and warm, being 66% alpaca, so, many thanks are due to TOFT for giving me the fleece.  I think the shading from the blend with 33% Jacob fleece has knitted up into a sophisticated version of the rustic look I most admire in natural yarn.  Compare it to the Huxtable Jumper.  I made that a year ago, with my first ever fleece. Like this Jacob, that one came from Huxtable Farm.
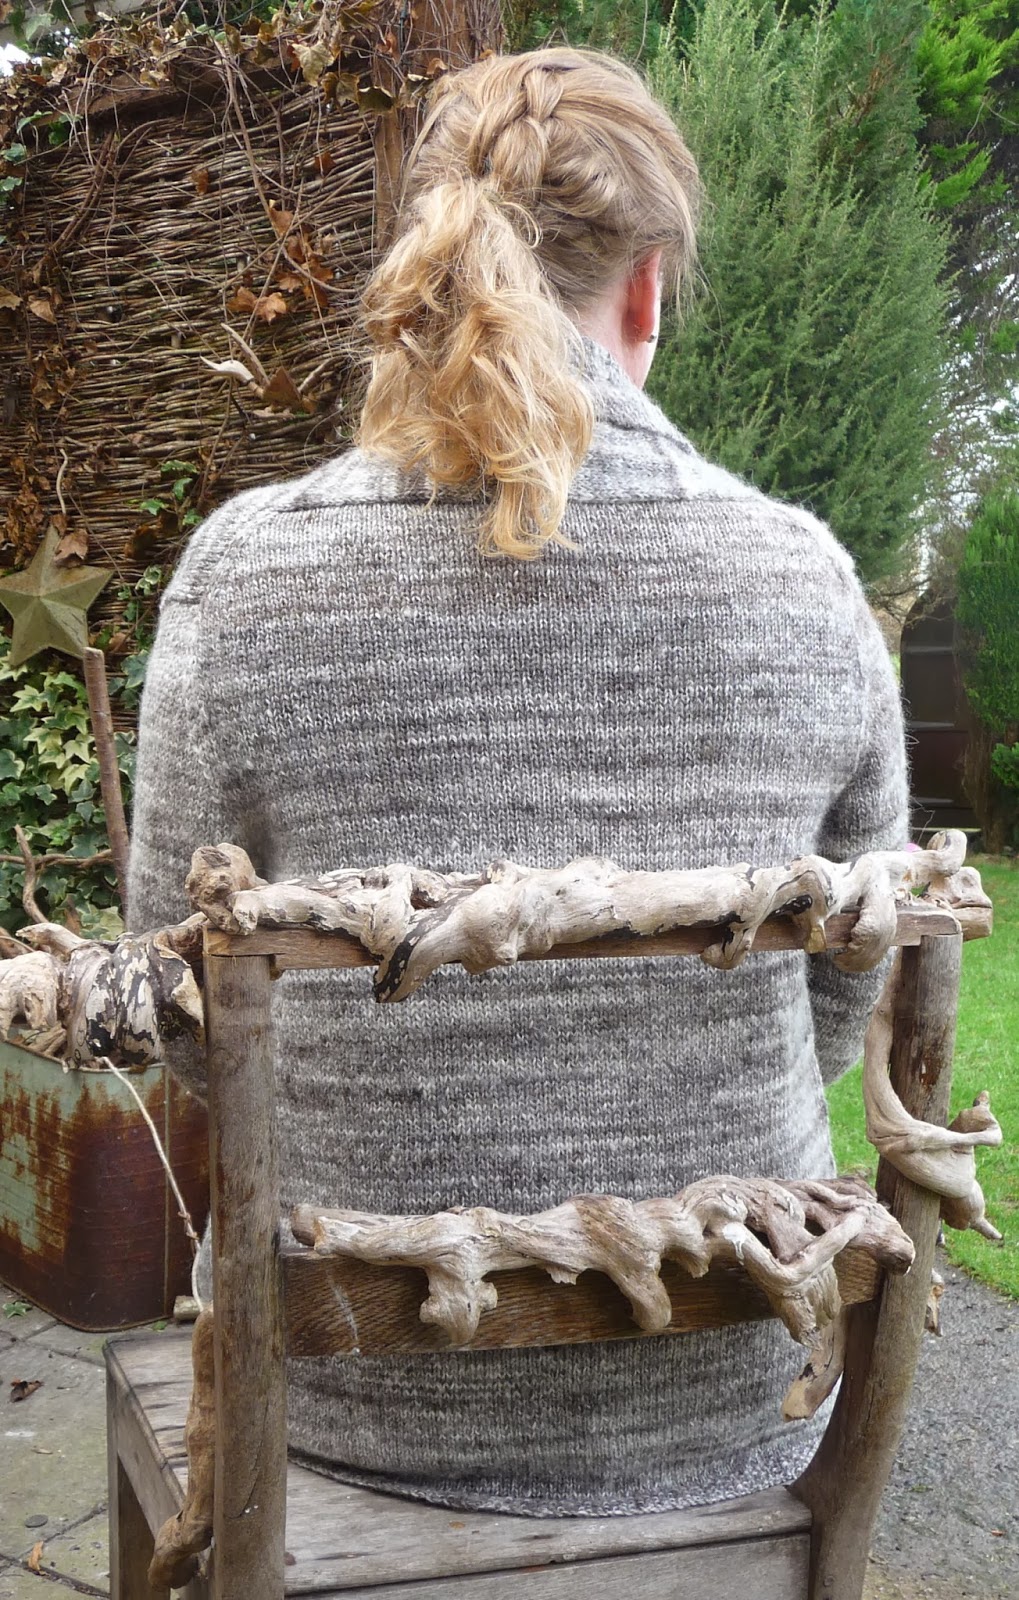
I sound, and indeed, today I am very self congratulatory.  I'd say I've come on a bit in a year of wool tribulations. Round to BG's house to drink her tea, show off and get her to take photos. From the back, see, I did copy the shoulders pretty much like the old cardi.  And the extra length does keep the draft off, as planned.  

What a smug blogger. Now I am bound to bugger the next thing up.

Friday, 14 February 2014

Spiral Pattern Needlefelted Cushion Design

This spiral pattern just worked itself out serendipitously.  My primary intention was to clear the decks of various substandard stash items. The idea of stabbing at a needlefelted cushion also suited a woman with a weary brain. Look how lush it turned out.  The pattern below is written as if there had been a masterplan. Actually, one step led to another, more by luck than judgement. I'd better write down how it was done, before I forget.  

Materials

70 x 35cm thick, stiff fabric
Scissors
Marker pen, ruler and two paper circles
Pins, sewing needle and strong thread
500g stuffing material
Felting needle
20m wool yarn
45g wool roving - 15g each of three colours

Method


The fabric I used was boiled wool, military grade, bought on eBay.  It feels like those horrible scratchy blankets of my childhood.  Close examination showed the tight weave has bits embedded in it which I am sure are fragmented grass and seeds. Not quite 100% wool.  Rough processing, not soft and no stretch.  
To work.  First, draw two circles 35cm diameter and cut out the fabric. Find the middle of each by folding in quarters and mark with a pen. Take a circle of paper and make a straight cut to the centre. Fold the circle into three and cut one third out.  This gives a template with 120 degree angles.  On each cut edge, make a mark 2cm from the middle and more marks at 3, 4 and 5cm.  Line the paper circle up with the centre dot on the fabric and put dots on it at these points.  Rotate the paper circle to line its marks up with one set of dots and make the third set of dots on the fabric.  To find the centres of the three outer spirals, put a ruler along each line of dots in turn.  Make a dot on the opposite half of the fabric circle 11cm from the central dot. Take the second paper circle and make a template with marks 1.5cm from the middle and at 2.25 and 3cm. 
Use this to make dots for the three outer spirals.  Repeat on the other piece of fabric.  Lay the two pieces together with the marked sides facing inward.  Push a pin through the centre of one and line it up to the centre of the other. Check that an outer spiral on each piece is facing an outer spiral on the other and pin together.  Sew a seam about 1cm from the edge of the circles, leaving a gap at the end big enough for your hand. Turn the cushion cover inside out.

Last summer, I bought several ill judged fleeces very cheaply.  For stuffing, I had a nice, soft, Down type fleece with an uncardable, uncombable staple length of only a couple of centimetres.  I put it through the washing machine, tightly packed nearly 500g into the cushion, then sewed up the gap.  Now I feel happier to put that one down to experience.

The yarn I used was the ball leftover from spinning a much better purchase, my glorious Hebridean fleece.  Take three lengths and needlefelt the ends into the central dot on the cushion. Form a semicircle of yarn to each of the inner three dots and poke the needle through the yarn to felt it on.  Trail each length of yarn in a curve to the next dot round and keep spiralling outward til you reach the outermost dots.  
Leave the loose ends dangling and repeat the process on the outer spirals, making sure that all three curl in the opposite direction to the inner one.  Now continue the inner spiral until the far end of each length of yarn is just above the top of an outer spiral.  Repeat the process on the other side of the cushion, making inner and outer spirals curl the same way as on the first side.
Fiddling about with all the loose ends, I abandoned thoughts of extra curly details.  Each line of the inner spiral links to the furthest away line of the next outer spiral, brought round to the bottom.  The remaining two ends of each outer spiral were continued to the top and dropped in simple curves to link up around the body of the cushion with the ends of the ones on the other side .

The roving is some left over from a year ago, when I was learning to use a drop spindle.  It dyed unevenly in the recent, disappointing Woad Vat Mark II, becoming rather matted in the process.  It would have to be combed again to spin it, but I had no problem pulling out pinches of fibre for needlefelting.

Starting with an inner spiral, fill in each of the three curls with a different colour.  This will also felt in one curl of each outer spiral. To keep the correct colour sequence, choose the shade that matches the section where the inner and outer spiral meet and felt back from there to the centre of an outer spiral.  Then carry on with the section, round to the other side of the cushion.  Fill in the remaining curl with the third colour, also continuing this segment round to the other side. 
When you have filled in all the outer spirals on one side, the colour pattern on the other side will be half completed.  Easy enough to see how to finish.  It takes absolutely hours to felt the roving on.  If your mind wanders, you'll stab yourself with the needle.  At difficult times in the past, I have attempted emptying my mind and thinking only of blue sky.  We once did this in primary school under the instruction of a supply teacher.  Though my class had an evil reputation, even our ringleader was tranquilised.

The needle felted dyed roving has a fuzzy softness. This is a firm, but huggable cushion. Blue spirals are therapeutic.  I realise where I have seen them before.  I couldn't meditate at the age of nine and I still can't now, but on a black night, needle felting enforced focussed attention.  For a while, troubles disappeared over the Mediterranean with Antoine de Saint-Exupery.  Si les insomnies d'un musicien lui font creer de belles oeuvres, ce sont de belles insomnies. 


Friday, 7 February 2014

Dyed in the Wool - Woad on Various Fibres

These are the things I soaked in readiness for dyeing with my saved woad precipitate.  After that sunk, though not without trace, I rediscovered 10g woad powder, bought long ago.  Woad Vat Mark II was an Aristotelian tragedy. For starters, my spectralite was too old to deoxygenate the vat properly.  After dumping in the remainder of the packet, I left the gas on and nearly boiled the pot.

Ete chic, the lovely lace knit pattern in alpaca and silk, came out khaki with splodges.  A hand spun Polwarth and Dorset Poll skein dyed with coreopsis plants is now an odd, seasick hue.  The roving and washed Dorset Poll fleece is unevenly blue.  The most rewarding result was the Gotland fleece.  Even that became a devil to card after the excess heating. Punished by Fate for my hubris, enough with the tragedy queen, time to get back in control.
First - fresh supplies from All About Woad.   Woad dyeing from the plant is unavoidably uncertain. Using powder, with careful weighing and measuring and timing, I should be able to standardise the dye bath and learn more about the other variables.  Woad Vat Mark III included an experiment with samples of different fibres.  I'd like to leave somewhat less to chance in future.
Plans formed, all I needed was time and peace to follow the instructions to the letter. Last Saturday, the 2014 Six Nations Rugby started.  Steve had a ticket for Wales v Italy. At breakfast, he was all a twitter with pre-match nerves, complaining that his toast was underdone and agonising over which hat would maximise warmth and style.  Against Italy, non fare brutta figura.
I put the wool in to soak, confident in the knowledge that I had the house to myself til the last train rolled back from Cardiff.  The instructions say 10g woad powder should dye 200g wool a medium blue.  How blue is medium?  This vat bloomed beautifully.  I got organised, taking into account the way the first material to go in always takes up more dye than later dips, which grow successively weaker.
My first objective was to overdye the remaining 50g skein of Polwarth/Dorset Poll handspun, previously dyed with coreopsis plants.  It came out unevenly blue/green, but the upper skein gives clear evidence that Woad Vat III was working well in comparison to the lower skein from Vat Mark II.
Also going in the first dip was 50g Dorset Poll fleece, previously unevenly dyed in weak shades of woad. That came out much more indigo than it started and a more solid shade, to boot.
Once these had taken the initial power out of the bath, the experimental fibre samples went in, all together, for a ten minute dip.  From the top left, going clockwise, the fibres are - silk pulled from a brick, washed locks of Polwarth, washed Dorset Poll, suint cleaned Gotland curls and finally, alpaca, which had a cold soak to get the dust out before dyeing.
  
The expression 'dyed in the wool' is used to mean a steadfast and unchangeable stance, as in 'dyed in the wool Welsh rugby supporter.'  Apparently, the idiom comes from the medieval cloth trade.  Fleece takes up more dye and keeps its colour better than yarn that is dyed after spinning and still more than cloth which is dyed after weaving.  

Polwarth took up woad most strongly, closely followed by the Dorset Poll.  Gotland has underlying natural shades of grey, so it is hard to be sure, but it certainly dyes well with woad, while keeping a lovely petrol lustre.  Alpaca, which is of course, not wool, took up noticeably less colour.


The silk fibres all clung together while soaking beforehand and didn't float loose in the dye bath.  After the first dip, only the outermost fibres had taken any colour at all.  This clump of silk fibres got teased out and put in for a second dip. Even then, the woad did not soak right through.  While the varied shades are pretty, if one was dyeing silk specially to get an even blue, it would probably be better to spin it first or maybe soak it for much longer in the dyebath.
After the experimental fibres, I dipped 50g white Dorset Poll locks and 50g Gotland. Repeated dips got what I would call medium blues, with a stronger looking effect on the Gotland.  

Watching the rugby on telly, it struck me that three of the six teams play in blue kit.  First, the Azzuri, Italians in alpaca blue, lost out to an uninspiring, but winning Welsh performance.  Knew Steve wouldn't be overly impressed, though naturally, tired and emotional on his return.  That evening Les Bleus, the French in Dorset Poll blue, won a gripping contest with England.  By the time my samples were dry on Sunday, the Scots, in Polwarth blue, had got thumped by the Irish.  Pob lwc to the Welsh boys, going to Dublin this weekend.


To exhaust the vat, I gave a long dye bath soak to a couple of apple leaf dyed skeins of Jacob/Gotland spinning, which have been lying around, a rather uninspiring mustard.  Would you call that Irish Shamrock Green? Good result, anyway.