"Nice pouches, Beaut."
"Oooo, do you like them? They're prototypes for an entrelac basket pattern I've been working on, which has the same basic construction method."
"A pouch or a basket - what would you call such a thing? A POB pattern?"
"Hadn't really thought about it. The curved shape just happened when I made a mistake knitting a flat piece of entrelac, so I could call this the Fortuitous POB Pattern."
"Go native, Beaut, call it 'Pob Lwc'. That means Good Luck in Welsh."
Sometimes my companion comes up with a pearl.
"Love it, Elinor. Happy and snappy."
This pattern can be used to make any size of pouch or basket (pob) in any weight of yarn. The final roundness depends on washing to cause at least a little felting before the pob is stuffed while damp and left to dry in the desired shape, so your yarn will have to be minimum 50% real wool without superwash treatment. A pob would be a good way to use up small amounts of leftover yarn from other projects if you knitted each of its eight sections in different colours and completed the top with a ninth yarn.
To choose the correct size of long circular needle, twirl three strands of yarn together, match the width of the twirl against the width of a knitting needle, then go down a size and use a needle which is slightly narrower than the three strand twirl. This should knit a reasonably tight fabric to make a secure container after felting. Nothing should be able to work its way out of your pob - that would not be much lwc at all.
To make handles, you will also need two double pointed needles in the same size as your circular needle, which will be used for knitting free lengths of icord, plus scissors and a tapestry needle for finishing.
Size and Quantities
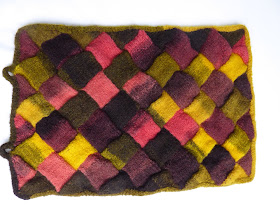
Entrelac is knitted in rectangles and triangles, each of which has the same stitch count. The greater the unit stitch count you choose, the larger your pob will be. To get a fair idea of the final size and the amount of yarn you will need, cast on ten stitches, knit ten rows of stocking stitch and cast off, then wash the piece to felt it slightly. Measure the width of your gauge piece and multiply by six to find the widest circumference that a pob would be if made in your yarn on your size needles with units of ten stitches. The depth of the pob, not including the icord rim, will be about 1.5 times the width of the gauge piece. Use these measurements to decide what your unit stitch count should be to achieve the size of pob you'd like.
Example - your ten stitch gauge piece measures 7cm wide. Therefore a ten stitch unit pob would be 42cm at its widest circumference (the brim will be narrower) and 10.5cm deep (not including brim). You would prefer a larger pob, so now you can calculate that if you use a fourteen stitch unit, that would make a pob of 59cm circumference and 15cm depth.
Weigh the gauge piece and multiply by 12 to find the weight of yarn you would need to make the body of a ten stitch unit pob. The construction lends itself to working in four colours and if you decide to do this, you will need three times the weight of the gauge piece in each colour. You will also need more yarn for making the top of the pob, the amount depending on whether you plan a simple brim or multiple turns of brim plus long handles.
Method
The dotted lines on this schematic show which sections become knitted together in which order. The labels A, B, C and D refer to four colours of yarn if you are working with four colours.
In the following instructions, X represents the number of stitches in a unit.
K = knit
P = Purl
P2tog = purl 2 stitches together
RS = right side
SSK = slip one stitch as if to knit, slip the next stitch as if to purl, then pass the left needle through the front loops and knit the two stitches together
WS = wrong side
Section One
In Colour A, cable cast on X stitches loosely.
P2, turn
K2, turn
P3, turn
K3, turn
continuing as above to KX and then break yarn and tie on Colour B
Section Two
In Colour B, with RS facing, turn work clockwise and pick up X stitches along the knitted edge of Section One
PX, turn
*Knit X stitches, turn and purl back* repeat (X-1) times
Break yarn and tie on Colour C
Section Three
In Colour C, with WS facing, turn work clockwise and pick up X stitches from the edge of Section Two, passing the needle from the RS to the WS so that the new stitches appear on the RS and the selvedge is hidden.
*Knit X stitches, turn and purl back* repeat X times
Break yarn and tie on Colour A
Section Four
In Colour A, with RS facing, turn work clockwise and pick up X stitches along the knitted edge of Section 3.
*Knit X stitches, turn and purl back* repeat X times
Break yarn and tie on Colour D
Section Five
In colour D, with WS facing, turn work clockwise and pick up (X+1) stitches along the edge of Section Four passing the needle from the RS to the WS so that the new stitches appear on the RS and the selvedge is hidden.
K X + 1, turn
*P2tog, P to last stitch, then P2tog last stitch of Section Five with first live stitch of Section Three
K back to end of row* repeat until only 2 stitches remain of Section Five, then purl those two together with the last stitch of Section Three.
Break yarn and fasten off.
At this stage, your work will look like this:
The live stitches of Section Four (on right of photo) now need to be transferred to the opposite needle, which puts that needle into position to pick up stitches from the free edge of Section Four.
Section Six
In Colour D, with RS facing, rejoin yarn and pick up X stitches from the free edge of Section Four.
P X, turn
*Knit to last stitch, then SSK last stitch together with a stitch of Section Two
P back* repeat until you have completed the knit row in which the last stitch of Section Two is used.
Break yarn and tie on Colour C
Section Seven
In Colour C, with RS facing, pick up (X+1) stitches from free edge of Section Two.
*P2tog, P to last stitch, then P2tog last stitch of Section Five with first live stitch of Section Three
K back to end of row* repeat until only 2 stitches remain of Section Five, then purl those two together with the last stitch of Section Three.
Break yarn and tie on Colour B.
Section Eight
In Colour B, with WS facing, pick up (X+1) stitches from free edge of Section Six, passing the needle from the RS to the WS so that the new stitches appear on the RS and the selvedge is hidden.
K (X+1)
*P2tog, P to last stitch, then P2tog last stitch of Section Five with first live stitch of Section Three
K back to end of row* repeat until only 2 stitches remain of Section Five, then purl those two together with the last stitch of Section Three.
Break yarn and fasten off.
 Your work will now look like a shallow box.
The brim will be knitted as an icord bind off, which will draw in the edges and provide a firm and inelastic top for the pob.
Basic Brim
In the Brim Colour yarn, with RS facing, pick up (X+1) stitches from the free edge of each of the four triangles using a circular needle. Do not turn your work, continue as if knitting in the round.
Cable cast on three extra stitches from the first stitch on the left needle and knit an icord bind off right round the top of the pob - here is a helpful video tutorial.
K (X+1)
*P2tog, P to last stitch, then P2tog last stitch of Section Five with first live stitch of Section Three
K back to end of row* repeat until only 2 stitches remain of Section Five, then purl those two together with the last stitch of Section Three.
Break yarn and fasten off.
 Your work will now look like a shallow box.
The brim will be knitted as an icord bind off, which will draw in the edges and provide a firm and inelastic top for the pob.
Basic Brim
In the Brim Colour yarn, with RS facing, pick up (X+1) stitches from the free edge of each of the four triangles using a circular needle. Do not turn your work, continue as if knitting in the round.
Cable cast on three extra stitches from the first stitch on the left needle and knit an icord bind off right round the top of the pob - here is a helpful video tutorial.
To complete the pouches, at the end of the first round of icord, I simply picked up another stitch from the top of the start of the icord before passing all four stitches back to the left needle, knitting two, then knitting two together through back of loops, picking up another stitch from the top of the icord and passing all four stitches back to the left needle. This builds a spiral of icord at the brim of the pob which you can continue to knit for as many rounds as you choose.
To make icord handles, you will need two double pointed needles, here is a helpful tutorial on knitting free icord.
At any point on the brim, knit an icord as long as the handle you want, then loop it in half as you return to the point where you started knitting free cord and continue knitting an icord bind off around the brim.
For a single strap, when you reach the opposite side of the bag, knit an equal length of free icord and pass it through the loop of the first before returning to complete the icord bind off. Sew the two sides of each icord loop together to make a sturdy handle.
For two handles, make four loops, one at each quarter of the brim circumference and interloop each pair.
Sew in ends and put the pob through a hot washing machine cycle to felt it. The misshapen lump that emerges should be tightly stuffed with towels and pummelled into a nice round ball shape, then left to dry.
I used a free Ravelry download crochet daisy pattern to make the decoration on the daffodil dyed basket which is shown near the top of this post. Haven't quite decided what I might add to this silver birch bark dyed shoulder bag. Maybe some green birch leaves?


