Showing posts with label Plant Dyeing. Show all posts

Friday, 2 August 2019

A Trial of Dyeing with Dock Leaves


As I paused to collect an armful of dock leaves, my companion, Elinor Gotland sighed.
"Why on earth bring home weeds when you've a whole garden full of dye plant flowers that need picking?"
"Well, I know pretty much what colours I'll get from my own plants and I fancied trying something new."
"You're such an adrenaline junky, Beaut. Couldn't you go bungee jumping instead of spoiling any more yarn?"
"This isn't just some random impulse, it's a cunning plan. Dock leaves could save me a lot of time and effort. In Jenny Dean's book 'Wild Colour', she says dock leaves fix yellow colours onto wool with no mordant." I snapped off one last spike and turned toward home. "Think about it, Elinor, dock is a plentiful wild dye plant so no time spent sowing, watering and tending to it and what's more, no time spent preparing fibres before dyeing them. Quick and easy."
"Yellow with no mordant? You're sure? All sounds that bit too good to be true."
"Well, I'm going to test these dock leaves out on some wool yarn. I'll try dyeing one unmordanted skein and one mordanted with 10% alum, see if there's any difference."
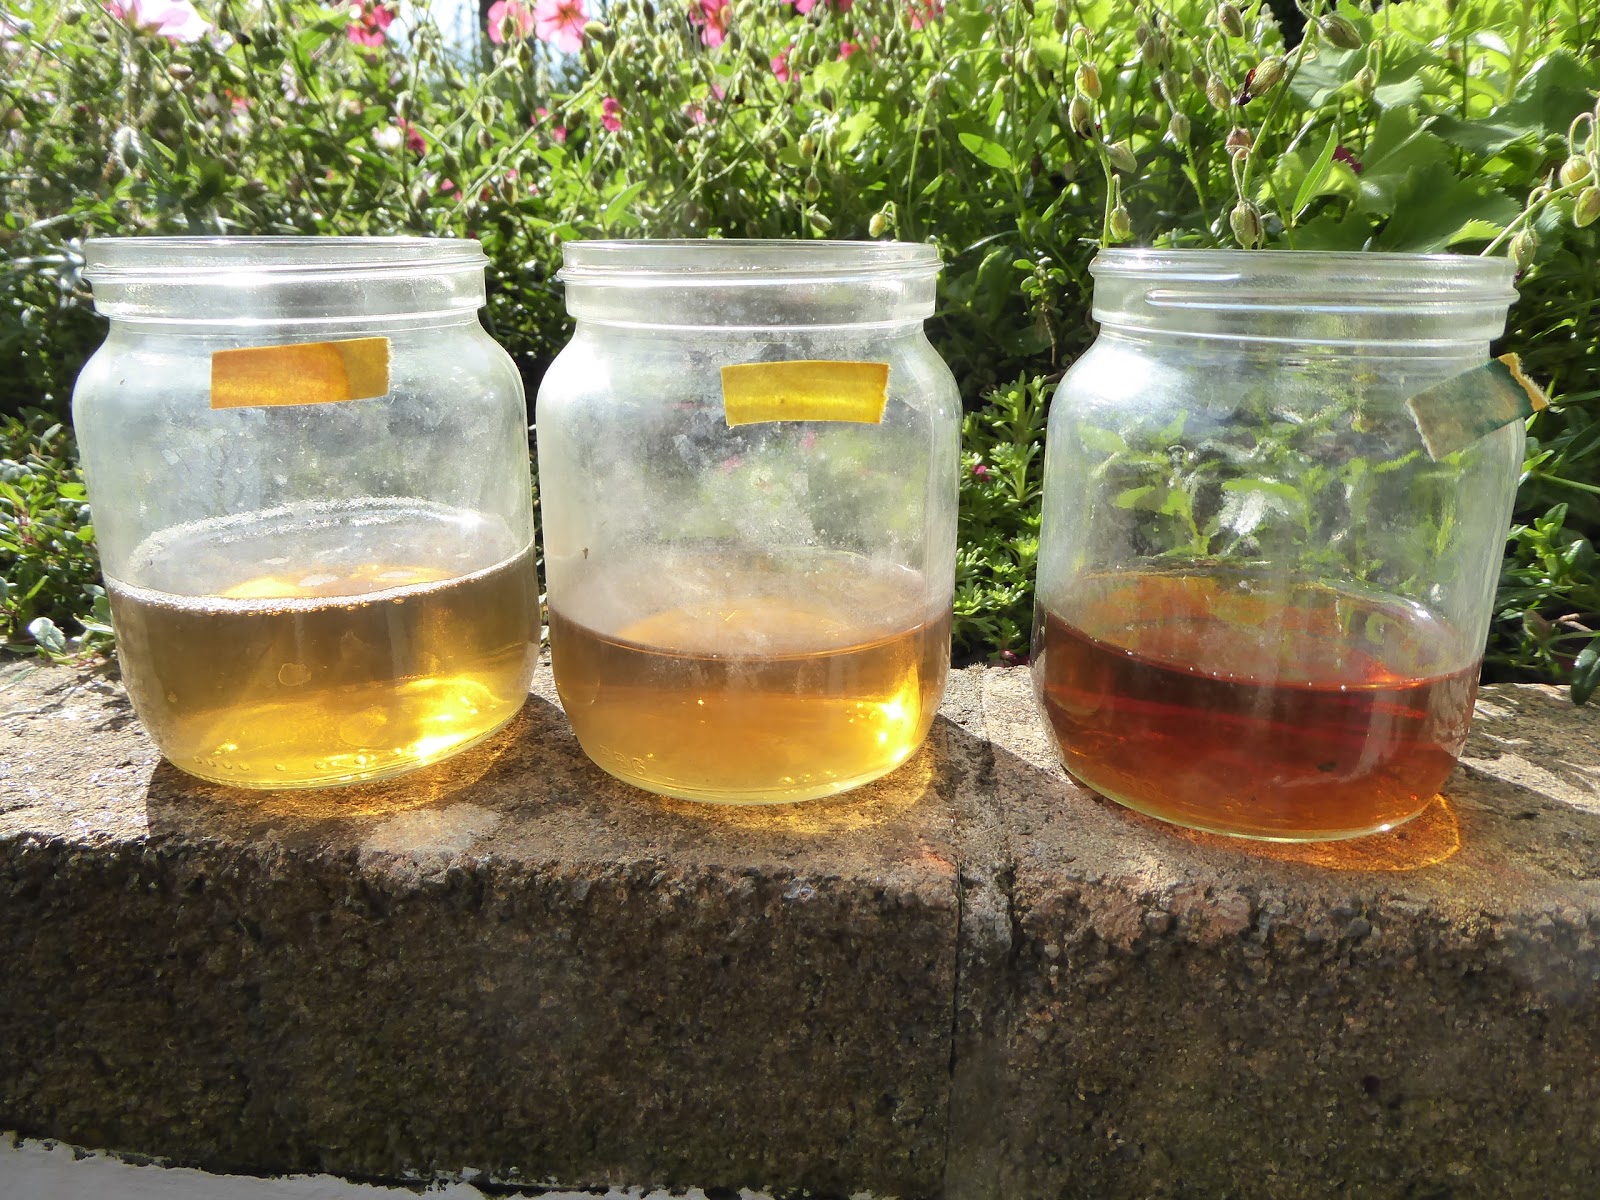


I simmered 400g of dock leaves in 10 litres of water and left them to cool overnight. When the leaves were sieved out next day, the dye (central sample) looked a very decent yellow. Testing with pH indicator strips showed it had become naturally acidic, adding vinegar to make the sample on the left more acidic made little apparent difference, while adding soda ash to make the sample on the right alkaline deepened the colour to a strong bronze.
"Feast your mistrustful eyes on that, Ms Gotland. Looks like a pretty good dye bath to me."
My companion glanced up from the crossword.
"Handsome is as handsome does, Beaut."


Two 100g skeins of wool went into the 400g dock leaf dye bath and were simmered for an hour and left overnight. Neither came out yellow. The one that had previously been mordanted with alum looked just a little browner, but if Elinor caught sight of this undeniably beige yarn, I was going to have to eat crow.
I put both skeins in an alkali rinse, hoping it would bring up the colour and it did shift them to a more golden beige. When one was further modified by heating it in an iron solution it turned a dark khaki green.
My companion wandered over.
"That's a lot of fuss you're going to with that quick and easy dock leaf dye, Beaut."
"Oh" I said airily "I've dyed loads of this yarn with yellow dye plants already. What I really needed was a bit of contrast colour."
One granny square pattern in heavy wool yarn on a 6mm hook was a quick and easy way to make a substantial footrest. The inside is stuffed with a considerable weight of failed experiments on yarn and fabric. 
I name this pouffe 'Crouching Crochet, Hidden Beige'.

Saturday, 29 June 2019

Dyeing with Weld Plants

A week ago I stood a tray of weld seeds in full sun on the greenhouse shelf because I'd decided long hours of daylight would germinate the seeds fast. No sign of life today, but no surprise because I found the compost dry as a Ryvita. My companion, Elinor Gotland, called from her deckchair on the lawn.
"Were you right about a bit of sunshine getting your weld seeds started then, Beaut?"
A full ten minutes watering the greenhouse had left me gasping in the humidity. I staggered out and veered across the lawn, attempting to dodge the question
"What a dramatic change this heat is from all the cool weather we've had." I reached the dye garden and stood there dripping sweat and trying to look nonchalant. "Rain then sun has really suited the weld plants, just look how many new flowers have grown." 


Since its main flowering spike was cut two weeks ago, my biggest weld plant has sprouted over a dozen lateral flower spikes. Quite an impressive effort.

That first main spike weighed 125g and has gone on to dye an even more impressive 250g wool yarn. Every batch of plant dye turns out a little differently, but since this one went particularly well, it seems a good point to record my current method.
I have found the strongest dye comes from chopping the plant material into large chunks and leaving it to ferment in cold water for at least three days, preferably a week. The water becomes faintly cloudy, slight frothy and properly stinky. Simmered for an hour, the dye bath looks only pale yellow and will test acidic at about pH 4 if you have indicator paper. 
Adding enough dissolved soda ash to bring the pH up to neutral 7 will turn a weld dye bath deeper yellow and I think leaving the plant material in the pot while dyeing also adds to the strength of colour. Starting with 125g weld, I first added two 50g skeins of wool yarn mordanted with 10% alum, simmered them for an hour and left them to cool overnight. Next day, they were a deep golden yellow, more like the colour from Dyer's Chamomile than the acid yellow I usually get from weld. I heated one skein with some dissolved iron to sadden the yellow to green and repeated the whole process with another two skeins, which went a more typically lime yellow. A last 50g skein was simmered soaked for a few days while I was away from home and even that turned primrose yellow.


"I think the first flower spikes give the strongest dye, Elinor. As they've given me plenty of dyed yarn, do you think I should do some contact printing with this second lot or just cut the spikes and hang them up to dry?"
"Best you let those flowers set seed, Beaut. Somehow I suspect you need to sow another weld seed tray."

Friday, 21 June 2019

Cultivating Weld Plants for Dye


I walked out into the garden thinking this could be the perfect day for sowing weld seeds and as I reached the greenhouse, my companion jumped up in delight. The miserable June weather has forced her to move her deckchair inside and while the interior of the new greenhouse does provide an exclusive orangery ambiance, mobile phone reception is so dodgy that the poor soul often has to trek back to the house to order her tea and biscuits.
"Feeling parched and peckish again, Elinor?" 
A gust brought rain in through the greenhouse door and mud splattered the gravel as I dumped down half a sack of sodden seed compost. My companion shuddered and stepped back.
"Do shut the door - if you care nothing for me, at least spare a thought for your chilli peppers. I can't think why you're bringing in compost, Beaut. This weather might feel like April but it's far too late to be sowing seeds."
I wiped my hands on my jeans and the rain off my specs.
"The summer solstice is upon us. Weld seeds germinate best with lots of light and since this is the longest day of the year, it must surely be a good time to start sowing next year's weld plants."


I usually sow all my dye plant seeds in March. The seed trays sit on the underfloor heating in the bathroom and within a matter of days, tiny shoots appear and off they go, out to the greenhouse to grow on. Weld is the only plant with delayed germination. I've found that even when seeds are sprinkled on the surface of the compost with no earth or vermiculite on top, they remain inert until they get not only warmth but really decent light. Still, sooner or later, weld seedlings do appear in the March sown trays and although officially a biennial, with an early start, most of the plants will flower the same summer. 


This year's March sown weld plants are presently modest clumps of leaves, half of which have put up flowering spikes about 40cm high. They'll grow bigger and when I cut the main spikes, plenty more will shoot from the lower leaf axils. A few young weld plants won't flower, they'll just remain as low rosettes of leaves. Next spring, those will grow into plants 1.5m tall which start flowering by the end of May.


Weld flower spikes provide a great weight of material and thus a better harvest of luteolin dye than picking individual leaves from young clumps. Spikes are also simple to hang up in bunches to dry and dried weld leaves store their strong yellow dye for at least five years. Once they have finished flowering, the weld plants die. Since the second year plants grow so much bigger and generate ten times as much material as those that flower in their first year, it has become clear to me that though you have to wait longer, it's altogether more productive to cultivate weld as a true biennial. I've tried sowing fresh seed in September, straight from the last of the weld spikes, but once again, have found germination is uncertain. Maybe that's because the plant has been forced to go on flowering unusually long because I've picked spikes til the end of August and by September, the light levels are diminishing with the season. Left unpicked, early weld flower spikes would be setting seed already which would be scattered by the wind around the summer solstice. 
So theoretically, I reckon today could be the ideal time to sow weld. Even if there's little sunshine, we do have have long hours of daylight. Next week it's due to get warmer and I'll try to remember to put up another photo of that seed tray. See how long it takes the seeds to germinate.


Friday, 14 June 2019

Dyeing with Dried Indigo Leaves Again


Since salvaging dye from the neglected Japanese Indigo plants of 2017 proved such an unexpected success, I felt much less pressure to use all of last summer's harvest in fresh vats. Following Deb McClintock's method, whenever I had a surplus, I cut stems and tied them in bunches to dry in the greenhouse. 


These have been stored in big paper bags under the spare bed. When I saw a beautiful pale blue shawl on a display at Wonderwool, I bought the pattern, thinking to myself I could recreate that colour using the dried indigo. Also, what a great excuse to buy some silk blend yarn to catch the light and show off the complex cabled border pattern. 
Once I dragged the first bag out and started to crumble the leaves off the stems, what appeared to be a large volume of dried indigo soon shrunk down to a modest net bag full weighing 200g.


Even so, that was twice as much as I had before. Once again, I followed John Marshall's instructions as described in Deb's blog, just doubling all the quantities. Previously I had dyed 200g wool tops with 100g dried leaves, so I expected a strong blue on my first 100g skein of yarn and a medium blue on the next and intended to dye a pale blue skein last. In practice, it took three dips each for two skeins to reach two shades of mid blue. Possibly the weight of dried indigo was deceptive, because I did leave lots of small stems in with the leaves. I exhausted the vat with a bit of wool blanket and have saved my other skein of fancy yarn for another time.


The dyed yarn is knitting up with stitch definition just as nice as I hoped and though this pattern takes all my concentration, it's a pleasure to make. Here's a link to an online source, Ravelry  of course, the designer is Helen Kennedy and it's called Closer to the Edge.


Friday, 7 June 2019

Using Madder Root and Water Only to Dye Alum Mordanted Wool


My companion and I stood on the doorstep, bracing ourselves to step out into the June rain drenching the garden.
"At least you won't have to water the pots, Beaut."
"I never water the madder barrels, those roots need sharp drainage. Mind, I don't know if that hot summer last year might have been too dry, even for madder."
"Well, you'll find out soon. Didn't you just use up the last of the dried roots?"


The remaining 100g of dried madder root from last spring's harvest had indeed been chopped in a food blender, covered with boiling water and left to soak overnight. In an attempt to replicate the success of my previous madder dye session, I followed the same minimalist process, simply adding more water next morning before putting in an equal weight of yarn mordanted in 10% alum. The pot was heated to more than hand hot but not boiling, kept hot for an hour, then left overnight. Despite the dye bath being naturally mildly acidic, the 100g skein of 4ply Falklands Merino/Silk blend came out a decent colour, though not as blood red as the alum mordanted skein of Blue Faced Leicester wool I dyed last week (shown balanced on top).


I had simmered the other half of that original skein of Blue Faced Leicester in the afterbath, just to see if the yarn itself might hold the key to success. Of course, there was less colour left in the dye bath for it to take up, but I do think it is somehow redder than the first. Apart from being a different kind of wool, I remember that that particular skein was among some that got neglected and accidentally left in a cold alum mordant bath for five days rather than two. It is dawning on me that the longer things soak in alum, the better they seem to dye, even though increasing the percentage of alum doesn't seem to make much odds. To exhaust the dye bath, two skeins of coarse wool yarn in pale shades of grey were heated briskly and left to fester for a couple of days before I poured the mouldy gloop onto the compost heap. By that time, it had fermented down to pH 5 and the yarn looked distinctly orange.


After we had walked the dog, I laid out the products of my two madder dye baths and sat back to contemplate them. Rain hammered on the skylight.
"Were those madder roots worth waiting three years for, Beaut?"
"Yes. I think so. I like all the colours and I'm a bit further forward with understanding the dye. Next time, I shall do an experiment dyeing yarn that has soaked in 10% alum for two days versus yarn soaked for five days."
"So, when you're dyeing with the roots you dig out of the next barrel, you won't be trying calcium carbonate or bran or rinsing the roots or changing the pH or the temperature?"
"Just adding water is good."
Elinor emptied her Wellington boot out into the sink.
"Not if you're a sock."

Friday, 31 May 2019

Madder Root Dye with Alum, Rhubarb and Iron as Mordants on Wool

"Perhaps I could mordant six small skeins of yarn, two of each with alum, iron and rhubarb, dissolve the calcium carbonate a day in advance, get hold of some real bran instead of using porridge oats, give the madder roots a boiling water rinse before chopping them up, then divide them into two dye baths and process one by heating to 80 degrees Centigrade and keep the other at room temperature for a week. Then I could compare the results and find out which works best, hot or cold madder dyeing. Only the cold bath would ferment over time and get more acidic than the hot one and that would affect the dye colours. I could keep adjusting it every day - what pH do you think I should aim for?"
I looked at my companion, Elinor Gotland, who got up from her chair.
"Madder, madder, bloody madder. It's all you think about."
"Exactly. I mean, I'd love bloody madder." I called after her retreating back. "You might be a bit more supportive. You'll see, when I've decided how best to optimise all the variables, I will get blood red out of these madder roots."
Elinor turned and blew me a theatrical kiss.
"Why not keep it simple, sweetie?"


Three 50g skeins of wool yarn were mordanted, one with 10% alum, one with 2% iron and the third was simmered with three rhubarb leaves to soak up some oxalic acid.
An equal weight of 150g dried madder root was chopped up in the kitchen blender, boiling water was poured over it and the pot was left to steep overnight. 


Next day, I added the three skeins, heated the pot until it was properly hot but not boiling, kept it hot for an hour and allowed it to cool overnight. No rinsing the roots beforehand and no additives at all, not even soda ash to raise the pH of the dye, which proved to be naturally mildly acidic when tested with indicator paper. 


Here are the results, fresh from the dye pot. The alum mordanted yarn, which was Blue Faced Leicester wool, had turned the truest red I have achieved with madder in ages. The rhubarb mordanted yarn was far more orange and the iron mordanted yarn was milk chocolate brown. I've read that alkaline modification can turn that brown to aubergine, so the iron mordanted skein had a soak in warm water with a teaspoon of soda ash before being hung up to dry.

"The brown one hasn't really gone quite purple enough to be called aubergine, but I'm astonished and so pleased with these colours. Particularly the red. Wish I'd used ordinary old alum mordant on all three skeins. I'd never have believed that you could get a good red from just madder roots and water."
I turned to my companion and to do her credit, detected no trace of smugness in her expression. She shrugged.
"Less is more, Beaut."
I put 100g of my finest alum mordanted Falklands Merino and Tussah silk blend 4ply yarn into the madder root bath and heated it up again next day. Even the afterbath gave a truer red than I have become accustomed to. Maybe I'll find I can't replicate the conditions and do as well every time, but it's tremendously heartening to get a win when you least expect it.


Friday, 17 May 2019

Silver Birch Bark Dye - Fresh versus Dried Bark


My companion, Elinor Gotland and I climbed over a huge silver birch fallen right across our path through the woods.
"Isn't it odd how trees withstand great storms coming the same way as the prevailing wind, then topple at a few gusts blowing in the opposite direction?" 
"There's a metaphor in there somewhere, Beaut." My companion leaned against a branch and lit up while the dog headed off after a squirrel and I got my penknife out. "Planning to peel the whole tree?"
"One percent of this bark would be far more than I could fit in a pot. It's a shame really, when you think of all the times I've gone hunting for birch to dye with and found nothing freshly broken."
"What makes you so sure the bark has to be fresh? Couldn't you just come back here when you need some more? Or bring a bag of peelings home to store? I remember seeing dried wood dye stuff on sale at Wonderwool." 
"That was logwood and fustic, not silver birch. I think bark does need to be fresh."
Elinor stubbed out her fag.
"Oh, I shan't argue. You know best."
Naturally, her unwonted complaisance quite toppled my convictions.


On the way home, we passed a silver birch tree that fell last winter and I stopped to examine the part I had peeled to dye a great pile of chunky merino wool and knit the Betula Jacket. Over the intervening months, the exposed layer between the core of hard wood and the silvery outer skin of the bark had dried, changing colour from pale green to a pinkish brown. A dozen tiny beetles scuttled for cover when I prised up a section to get a better look.


The dye bearing underlayer had turned russet brown and friable. It was easy to flake off a few big chunks. Back in the kitchen, I put 100g of this old bark in one pot and 400g of the fresh bark into another, added water and left them to ferment for a week. On day eight, both pots were simmered for an hour and left to stand overnight.


Testing with indicator paper showed both dye baths had fermented equally, dropping to pH 5. Once I had added enough soda ash to raise the pH back to neutral, there was an obvious difference between the two samples, the fresh bark dye being a warm orange while the old bark dye looked pale yellow. 


Here are the results of dyeing two 50g skeins of unmordanted Blue Faced Leicester yarn by simmering them almost at the boil, one in each bath for over an hour. The old bark gave no pink at all, just a hint of tannin beige. Perhaps over time as they turn the bark itself visibly russet brown, the dye molecules in silver birch bark oxidise or otherwise change their state. Presumably the dye becomes insoluble once you can see it in the wood, since no pink was extracted into the dye bath from the old russet bark, while plenty came out of the pale, fresh peelings..


To make it a fair trial, in each bath I dyed fibre totalling half the weight of the bark. One hundred grammes of old bark dyed (or didn't dye) 50g Blue faced Leicester wool. The 400g of fresh bark dyed 50g Blue Faced Leicester and also 150g 'British Wool' - tough old carpet yarn of unspecified species - another of my Wonderwool bulk buy bargains in three base colours, cream and two shades of pale grey. I think overdyeing grey robbed the pink of some of its warmth, giving it a faintly mauve caste.


All this dyeing was done with the bark still floating at the bottom of the dye pot. I've noticed that after repeated heating with new batches of fibre, the dye bath becomes a stronger orange/pink rather than appearing paler and weaker. I guess that more dye is being released from the bark with more time and warmth. While fibres don't need mordanting, they do need to be taken almost to the boil before the dye latches on. Silver birch bark is both curious and generous dye stuff. I put another 150g carpet wool in the pot next day and it dyed at least as deeply as the first lot. Felted wool blanket weighing 300g was turned a peachy pink the day after that.


I turned to my companion.
"See I was right, silver birch bark does have to be fresh to give pink dye."
"If you recall, Beaut, I said as much myself. Still, credit where it's due, that's a considerable result from 400g bark."
"I noticed today the fresh bark has turned dark red in the dye pot. Funny how the initial orange dye bath turned wool deep pinky brown, and now the bark and the bath both look dark red but don't dye things half as strongly. This morning I took out this big skein of two ply merino and Tussah silk blend and the colour on the yarn is much paler now, but I think a soft pink shawl might be rather lovely. There's a cotton Tee shirt I might dye too. It takes a lot of fibre to exhaust a silver birch bark dye pot and I do like the paler pinks."
"No need to push your luck, though. That whole tree is still lying in the woods and the bark can't have dried out in just two weeks. Get your penknife, put the dog on her lead and let's see if we can beat the beetles to it."


Friday, 19 April 2019

Dandelion Flower Dye - One Yellow, Three Greens

On the first of April I turned the page of my calendar to see a picture of dandelion dyes. The day was sunny and light of heart with the promise of spring, I grabbed a bag and set off for my usual hunting ground, a wide verge beside the A48. 
Sure enough, the grass was ablaze with dandelion flowers. I used to feel horribly self conscious crouching to pick them as fast as I could, imagining people driving past might consider me foolish. This year, that galvanising thought had barely occurred to me before the verge was stripped. Once I got home, I found I had only 700g of dandelions, rather less than the usual kilogramme.
I simmered the flowers for an hour and looked for some fibres to dye. This 200g of super chunky singles wool yarn from World of Wool was mordanted with alum a couple of years ago and has been lurking at the bottom of the basket because I've previously found the white Cheviot yarn didn't seem to take up much from plant dye baths.
The following day, the skeins of yarn were simmered in the dandelion dye bath for an hour and left to cool. The day after that, I hooked them out for a look at the result and my companion, Elinor Gotland, glanced up from doing her crossword.
"Of all the weeds in all of Wales, that is the most weedy yellow you've ever dyed, Beaut."
"Mmm, not enough sunshine yet, not enough dandelions and not the ideal yarn, either. Still, I've not given up hope. This dye bath has been fermenting for a couple of days, it's bound to be acidic. The colour will look better after a rinse in plain water."

Though my companion looked dubious, I wasn't wrong. The skein on the far left of this photo was simply rinsed and dried, the second was reheated in half the dye bath with a splash of iron solution before rinsing and the third was reheated with copper solution, which modifies colour best in an acidic environment. The fourth was originally the grey skein, proving once again that yellow + grey = green.
All four skeins were knitted into an entrelac bag which was felted in the washing machine with colour washing powder. I expected the alkaline powder to intensify the dandelion dye colours even further and I'd say the plain yellow, the grey base and the copper modified greens did get marginally stronger. One surprise, the iron modified skein shifted to a rather beige toned green variation, which hasn't happened before. 
I'd never claim to be astonished by beige, that just seems to be the default state for amateur natural dyers. I stared moodily at the beige sections of the bag.

My companion waved a hoof.
"Cheer up Chicken, it's Easter, the family are coming and it's time to hide chocolate in the garden."

Elinor will not be missing a trick from her eagle's nest. 
I suspect all my eggs may end up in one basket.

Friday, 29 March 2019

Red Onion Skin Dye Colours Modified with Alkali

"The onion skin bag turned out alright, didn't it Beaut? No need for all that doom and gloom." 
drank my tea and admired its colours, all warm and autumnal in the Spring sunshine.
"Oh, I always thought I'd get there in the end." 
My companion lit her cigarette and blew smoke rings into the green air.
"You didn't look too confident to me. Only a couple of days ago, I recall you sobbing and moaning and threatening to fall upon your own knitting needles."
"Well, it was a struggle. I'm not sure I'd try this method again."
In the absence of a long colour change yarn, I had decided to knit entrelac using a load of 25g skeins I'd dyed with brown onion skins and red onion skins. My intention was to work each square to give the appearance of one colour weaving under and over the next. Which meant an awful lot of ends to sew in.
Instead of casting on for the entrelac, where I've found it hard to make the initial edge sufficiently loose, my other great idea was to knit a strip of cable to become the gusset and the handle. Then I began by picking up stitches for the entrelac from one side . First problem was over-enthusiastically making too many starting triangles and having to unpick the edges of the top ones back off the gusset.
Second problem was the lumpiness of joining entrelac cast off triangles along the bottom edge, which I did by picking up a stitch from the gusset at the end of alternate rows and purling three together, instead of two. Third problem was making the joins of each triangle along the opposite side equal in length to the cast on triangles - it should have been straightforward, picking up one stitch from every other row of the gusset, only somehow, it wasn't, and had to be frogged and reknitted, repeatedly holding the two sides together to check they were equal.
Knitting the front of the bag, it was easier to copy the spacing. I planned an i-cord edging to finish the entrelac panels and for once in my life, I did knit and edge a swatch, which was intended to become an inside pocket. In the wash, the i-cord shrunk more than entrelac, so I learnt to pick up nine stitches across each of my eight stitch triangles and add three stitches for going round corners.


A more unexpected lesson of felting the swatch was finding out how significantly the colours of the red onion dyes would shift when washed with colour washing powder. I know washing powder is alkaline, but when felting, I prefer to use it even with plant dyes because I believe the roughening caused by alkali helps wool fibres felt better than simple hot water and friction. However, I didn't anticipate much colour change. Previous experimentation with soaking brown onion dyed fibres in alkali solution hadn't modified the colours perceptibly. As you can see from the photo above, unlike the brown, the dyes from red onion skins did all shift toward yellow once the bag was exposed to alkaline washing powder.  Most obviously, the green wool, used for the i-cord edging, which had been alum mordanted before dyeing, had turned a rich orange yellow and the unmordanted, deep chocolate yarns had become more red. The various shades of ginger yarn, which had been dyed with brown onion skins, did not change nearly so much. Two kinds of onion, two kinds of dye.
"Mmm, I love the bag lining. Feels like suede."
"It's a remnant of that fabric Mum used to upholster my armchair. There's still some left. I might try another experiment with entrelac, see if I can knit a bag in a ball shape. Like that time when I accidentally joined the wrong edges of the squares together and the fabric curved round."
My companion explored the handbag, emerging from the inside pocket like a young marsupial.
"Like childbirth really, isn't it?" 
Thinking of kangaroos and joeys, I failed to make the right connection.
"How?"
 Elinor waved a hoof. 
"Making up knitted bag patterns, Beaut. You forget all the pain soon as you have it on your arm."