Friday 28 April 2017

Shawl Joy by Sylvia McFadden - a Review

When I saw this picture of 'The Rain Outside', after much browsing through shawl knitting patterns on Ravelry, my heart swelled with sheer delight. It was perfect, perfect, perfect. 
In all three of her 'Rain' shawl designs, Sylvia McFadden incorporates short row segments of lace patterning into the long, narrow, crescent shape, making them ripple with organic asymmetry. Though lace knitters commonly confine themselves to very fine yarns, this pattern used double knitting weight, which fortuitously, was exactly what I had brought home from my holiday in Tacoma. The destiny of that yarn was quite decided when I read that Sylvia lives in Vancouver, which is not so far north of where I had been visiting. 


I knew traveling back with some of the hand blown glass they make in the Pacific Northwest would have been a fabulous disaster, shattering my bank balance, if nothing else. I think just gawping at all the Dale Chihuly work around the Museum of Glass fired me up to choose flaming colours when shopping for a rather more portable souvenir of wool.


Sylvia McFadden's shawl shape reminded me of the organic curves I had watched being blown and drawn out from molten glass. By changing her subtle two toned grey stripes for my red and brown Targhee yarn from Brooklyn Tweed, I hoped to enhance my shawl's resemblance to bright, wriggling glass ridges.


'The Rain Outside' pattern has a clear structure, starting with an overview of the order of things, so that the knitter understands how the work should progress with each step. I am not great with charts and really appreciated also having a row by row written version of the lace inserts. Whenever I got to one of these sections, I knitted it with handspun Abstract Fibres Targhee topswhich had been burning a hole in my knitting basket. Although I messed up getting pure colour changes while spinning, each of the six short row segments did knit up with differing overall shades. I remain mystified by the pattern instruction to work the repeat four times for inserts 4, 5 and 6. The pdf download for 'The Rain Outside' has alluring images of the finished shawl being tossed in the air. Unfortunately, these don't help when you need a visual clue as to how the whole shawl should look when laid out, good job I could go back to check the photos on Ravelry.


My 100g of red Brooklyn Tweed ran out a couple of rows before the true pattern ending, but no-one is going to notice. By luck rather than judgement, there was still plenty of handspun to knit the clever bind off, which is worked in rows at 90 degrees to the body of the shawl, eating up the live stitches sideways. Finally, washing and blocking revealed the final shape.


Delighted with my Tacoma shawl, I named it 'The Fire Inside' and wore it to show off at Wonderwool, having already sent my money to Canada for a copy of Sylvia McFadden's printed book of six patterns, which is called 'Shawl Joy'. This only took a week to arrive in Wales and was worth the wait, being a substantial A4 size with lots of beautiful and useful pictures on thick matte paper. It includes two top down triangle shawls and a centre-out square shawl as well as the three crescent shawls of the Rain series. Sylvia calls the combination of charts, short rows and lace she dreamed up for these 'a lovely, new unvented thing'. I heartily agree and applaud most of all the generous spirit which led her to include pages in the book which share the method and enable her readers to design their own versions. 


Did I mention I brought home two lots of Targhee tops and more Brooklyn Tweed yarn? I spun the orange and grey tops straight from the undivided braid and navajo plied the single, to keep the different colours as clear as I could
and in the longest possible stretches of yarn. Quailing at the thought of charting my own lace inserts and deciding that while he will cheerfully tart about in lycra outfits to go cycling, himself might baulk at wearing lace anyway, I used the basic shawl construction and the short row ideas given in 'Shawl Joy' to knit my husband a simpler, but unique scarf.
100g grey Brooklyn Tweed dk yarn made one set of plain garter stitch ridges and 100g hanspun Targhee made the alternate ones, into which I added short row inserts of stocking stitch, whenever it looked as though the yarn would have a long run of orange near one edge or grey near the other. Except when I got mixed up.

I'm calling this one 'Hot Coal'.
Sexy if you're Welsh.

Many thanks to Sylvia McFadden. Shawl Joy indeed.
ISBN 978-0-9952734-0-5 
Published by Hemlock Printers, B.C. Canada in 2016


Friday 21 April 2017

Dandelion Flower Dye on Wool and Cotton

I straightened up slowly after wrestling a particularly recalcitrant weed out of the lawn. Crumbs of earth spattered up against the back of my companion's newspaper as I flung the beast down onto the patio.
"April really is a cruel month for dandelions, Elinor. This one put up quite a struggle." 
She dusted off her crossword puzzle, regarding me with some irritation.
"You might look very savage all covered in mud, but I see the plant won. Carry on digging in that slap dash fashion, snapping off half the root and the dandelions will grow back in no time." Elinor stomped across the lawn. "Look, this one is already setting seed. Soon you'll have a whole new generation to contend with."


I flopped into a chair. 
"I've been saving the flowers, though I suppose I could have another go at dyeing with dandelion roots, lots of online sites list them as a source of magenta red. Don't know if I can be bothered, though. Last time I tried, I got no colour at all. Not even beige."
"Which of the 234 species of dandelion root did you try?"
"I have no idea."
"Well, consider this a great opportunity for a controlled trial, Beaut. I should think most kinds of dandelion have found a home in your garden."

My dandelion dyeing objective was much simpler, just the April project from the Plant Dyes for All Seasons 2017 Calendar. Though I've heard you can also dye with the leaves, it was only too easy for me to gather 300g of dandelion flowers, this being about five times the total weight of the small skeins of wool I planned to dye. All of them had been mordanted in advance with 10% alum. Wanting to double check the effects of shifting pH and modifying the dye colour with iron and copper, I decided I was already confident enough of the necessity of using a mordant for dandelion dye.


After simmering the flowers for an hour and sieving them out of the bath, I added the soaked yarn, simmered it for another hour and left it in the dye pot overnight. Next day, the wool had taken on a pale greenish yellow colour and I put one skein aside as my reference point. In the photo above, it is on the far right, with the other skeins described anticlockwise. The pH of the dye bath was already naturally slightly acidic and soaking the second skein in water with vinegar made it only marginally paler. Soaking the third skein in water with dissolved soda ash to alkalinise it made the yellow come up much brighter and clearer. Pouring the remaining dye bath into two pots, I added some iron dissolved in water to one and copper to the other. The fourth and fifth skeins were warmed for half an hour in these two pots before rinsing, iron modified the original colour to a grey green, while copper made it go bright green. I think that last is the nicest colour I got, very vernal.
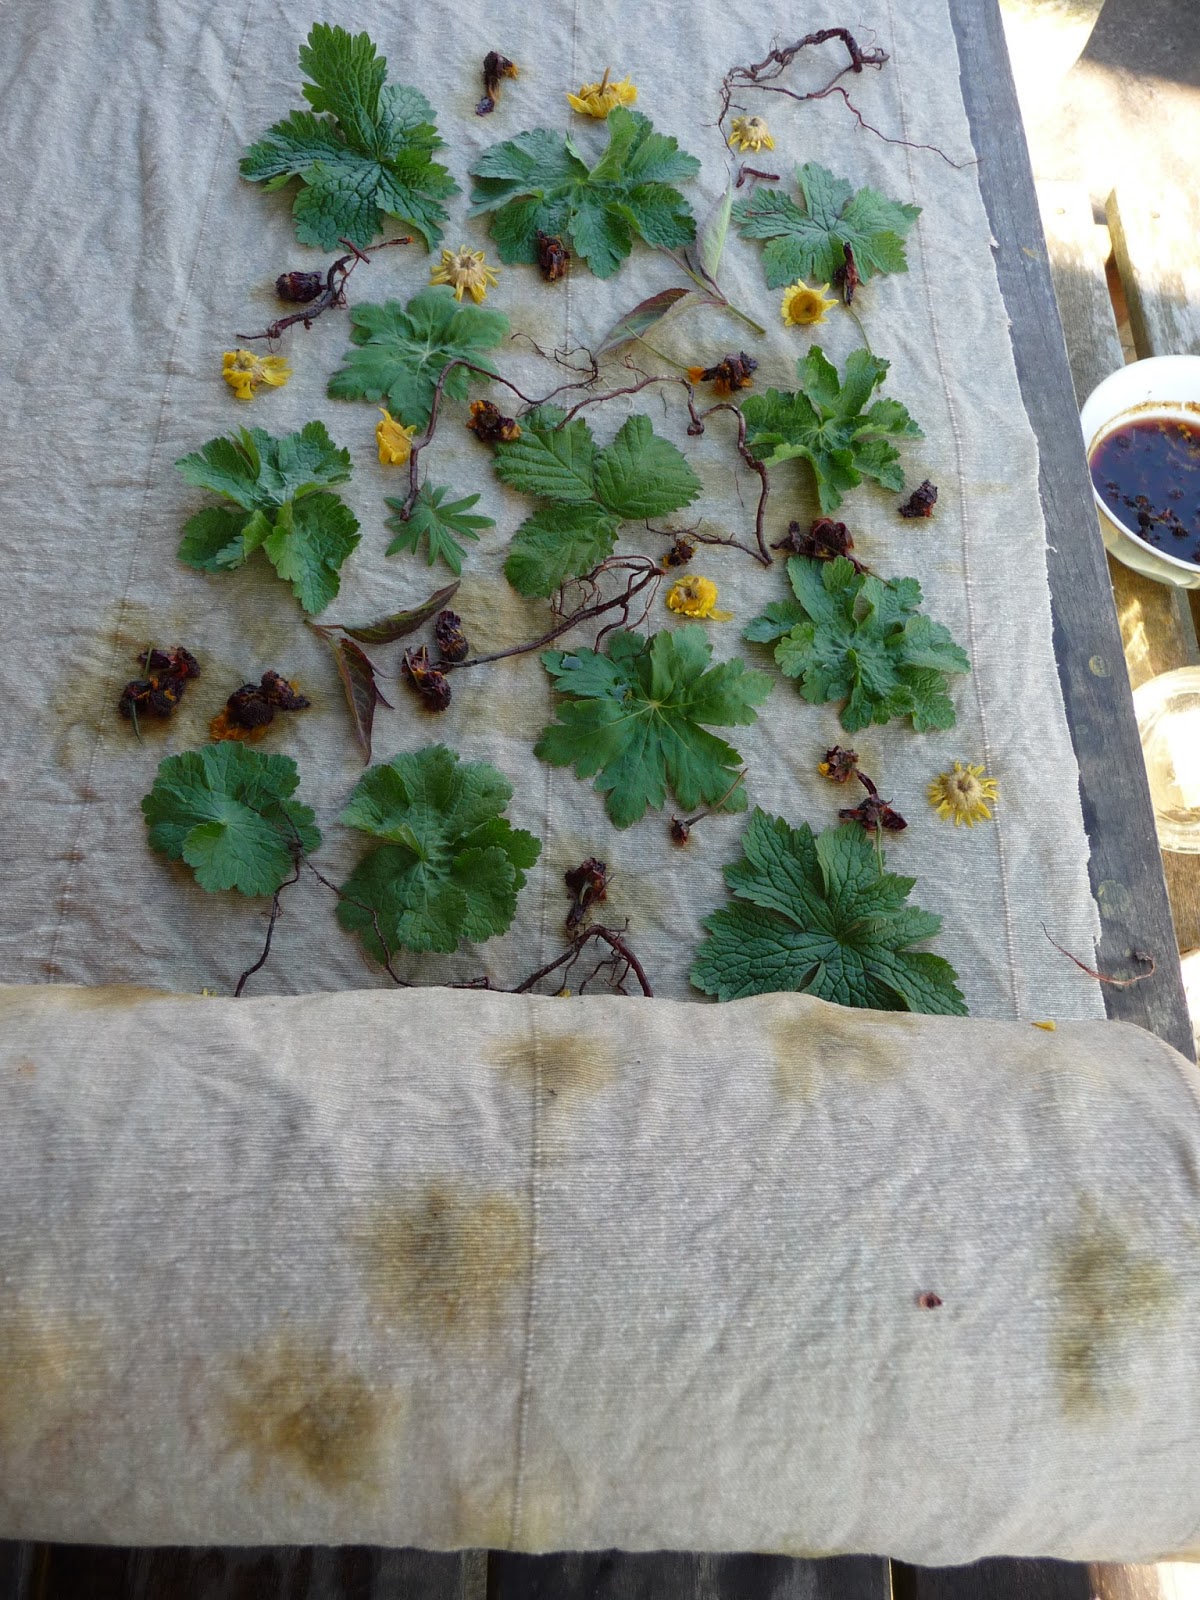
Having gathered another whole kilogram of dandelion flowers, I remembered a previous occasion, when I wished I hadn't squandered expensive woollen fabric on such an unremarkable plant dye. This time, I used a long offcut from some cotton and linen mix curtains, which had been mordanted with aluminium acetate. Well wetted and rolled up around some blackberry, hardy geranium and lycestra leaves with some dried flowers of coreopsis and chamomile and bits of fresh madder root to add splashes of yelllow, bronze and red, the bundle was tied with string soaked in dissolved iron. Expecting the iron to turn the dandelion dye a dull green, I simmered the loose fabric at the top of the roll in the
pot of dandelions on its own, before standing the roll up the other way in the pot with the business end submerged.
After an hour or so simmering, overnight soaking and a day or two to dry, the roll was unrolled. Dandelion dye had made the loose part of the cotton/linen mix go a similar colour to the first sample skein of wool, the roots and flowers had contact dyed the colours I had hoped for and the leaves had made iron prints.


In this photo, the fabric is folded in half, with the part which was innermost on the roll showing. The outer portion gets a bigger dose of the iron from the string and the colours are thus more saddened and the leaf prints more dense.


It has been one of those months. Good in parts. Plenty of dry weather and a fair amount of sun, but not many of my dye plant seeds have done well. The coreopsis seedlings mostly curled up due to thrips in the greenhouse and three successive sowings with no germination have convinced me my saved weld seeds are no good. No use grieving. I have ordered a new packet of weld seeds and some plug plants of other kinds of coreopsis. With some embroidery, the duller end of the cotton print made a cushion to thank my friend BG, who gave me the curtain material. 


At last, the time is ripe.

Tomorrow we are off for the weekend of all wool festival weekends!

 Awake BG and with my Mum,
The happy road to Builth Wells run;
Shake off dull sloth and joyful rise,
For Wonderwool at half past five.

(Poetic licence there, we shan't actually leave til quarter to eight and I shall be driving.)

Friday 14 April 2017

Dyeing Plant Prints on Boiled Eggs

With family staying over the Easter holidays, I have enjoyed coercing visitors into trying natural dyes on hard boiled eggs. A friend showed me this video, which makes plant printing on eggs look like child's play. In practice, the first challenge was to find eggs with shells that weren't naturally brown already. After opening boxes all along the supermarket shelves, I bought a dozen white duck's eggs, a red cabbage and one onion, which I bagged together with all the loose brown onion skins in the tray. Next, to take my visitors for a hearty dog walk in the great outdoors, armed with a tub for collecting small leaves and flowers. Then another trip to the supermarket to buy a multipack of cheap nylons - none at home, I forgot that I haven't had to wear tights for years.


Cutting 20cm lengths off each leg of the tights, we tried to flatten leaves and flowers against an egg, then pull the tube of nylon over and stretch it away from the egg to tie the spare material in a knot. Keeping more than one flower flattened in place did not go well. Plant material has a tendency to roll itself up during the stretching and the egg may catapult off.


"Cracking start, Oscar." My companion, Elinor Gotland, considers my younger relatives fair game for her rapier wit. 
"Did you fancy an omelette?" 

In the video, the process only takes a second, but on close observation, you can see that the tube of tights starts off stretched over one hand, the egg and the plant material go into that palm, then the spare nylon is brought over the back of the hand and knotted on the other side of the egg.

"There now, I said just to use one leaf or flower, keep it simple, eh, stupid?"
Elinor went over to critique the dye pots.
"Sure you've got enough onion skins in here? Don't want to mess anything else up, butty bach." 


Unfortunately for Elinor, she had underestimated my nephew, who is quite hardened to cruel and disparaging remarks. 

Half the red cabbage was chopped into a casserole pot and our remaining eggs were wrapped and put in with it. All we had to do now was rescue Elinor, add water and boil.


After ten minutes, the eggs inside must have been boiled, though their shells still looked pale. After twenty minutes, the onion skin eggs looked seriously sunburned, while the cabbage eggs had only the merest tinge of frostbite, as shown in the photo. Turning off the heat after 30 minutes, we left the pots to cool. 
The video says they should be refrigerated for another unspecified period, maybe the extra time helps dye uptake. Since the red cabbage eggs did look quite blue once cool, without refrigeration, we went straight in there with the scissors, snipping off the tights and peeling away the bits of plant.


The fine leaves of fern and fennel made my favourite effect, though broadly speaking, I think the best results came from thicker and more substantial bits of plant material. I ought to warn you, the whites of the eggs take up a bit of dye through the shell, though no taste of onion or cabbage.
Only two days time and there will be chocolate eggs. Face it, nothing else compares.


Friday 7 April 2017

Contact Printing with Dried Dye Plants

"Morning, Beaut. Lovely day." 
My companion, Elinor Gotland, came out to the greenhouse to find me transplanting dye plant seedlings into small pots. "I've brought you a cup of tea. Got to keep your strength up."
"Thanks. Quite what am I going to need my strength for?" 
Since I usually have to lure Elinor out of bed with the smell of fresh toast, I was already wondering what plans she had in mind.
"Those dyed silk scarves you make. Can't find any of them knocking about the house."
"There are a couple with autumn leaf prints in the craft shop, but all the colourful summer ones were sold out by Christmas."
"High time you restocked for the Easter trade. You could do a bit of ecoprinting today."
"Elinor, I can't make any more scarves til these seedlings have grown into proper plants. How about telling me what you want one for?"
"Since you mention it, Beaut, I'm off to an awards ceremony this weekend. A new silk scarf would be just the thing for swirling about in - you know how the cameras dwell on the nominees."


Drinking tea, we wandered round the garden. Plenty of manure top dressing was steaming in the sun, the grass was growing, but not a lot else. Elinor started eyeing up my tulips. I don't think they would print well and I like them just where they are. Better nip that idea in the bud.
"How about if I fetched my dried dye plant stores down from the attic?"


My companion looked dubiously at the shrivelled bunches of meadowsweet and papery spikes of weld.
"Are you sure we wouldn't be better off picking the tulips?"
"I've got a couple of sprigs of florist's eucalyptus too, they give fantastic orange leaf prints."  I said firmly, submerging the lot in a bowl of water with a splash of vinegar and some iron from a jar of dissolved ferrous sulphate. I found two silk scarves and a section of tubular jersey silk noil which had been mordanted with alum ages ago. There was even a big piece of fine wool gauze, lying forgotten at the back of the drawer. Might as well soak them all, dye them now and put in a new order from Whaley's. That afternoon, I poured hot water on bowls of dried chamomile and coreopsis and set about laying leaves and flowers onto the wet fabric and rolling it up round sections of plastic gutter tubing.


The string tying the silk noil bundle was black from being soaked in iron and used in dye baths many times before. Never mind, that jersey noil wasn't particularly nice. Putting the remaining dried meadowsweet into the water in the pot with this bundle, I turned on the gas.


Selecting some less stained string, I tied up the two habotai silk scarves . As extra protection, I thought I would try an outer layer of greaseproof paper on one of them, to see if it would minimise string binding marks and avoid having the outermost part of the silk roll dye differently to the layers inside it. Then I rolled paper round my expensive piece of wool gauze.
Lucky Elinor wasn't about, because the dried plants looked miserable, soggy and saggy after a few hours soaking. Even though they rehydrated very quickly and had kept their colour, the petals on the chamomile and coreopsis flowers clung to their centres making shapeless splots, not at all as pretty as they are when used fresh.
The last three bundles went into pots of plain water and all four were simmered for a couple of hours, left to cool overnight, dried out for a couple of days and finally, unrolled. I kept them another couple of days to cure, then rinsed them all in a few changes of water before putting them in the washing machine with a pH neutral detergent on a 30 degree wool cycle.


Not the most spectacular results, the first conclusion I can draw is that my dried garden plants don't print as well as when used fresh. The eucalyptus is supposed to dye better once dried. Parvifolia had only left faint brown prints on the silk and I wondered if it ought to have had longer heating at higher temperatures. 

Quite another story with this bold print Parvifolia eucalyptus made on the wool gauze. Wish I had had a bit more eucalyptus for that bundle. My own dye plants also performed differently on the silk compared to wool fabric.


Here are meadowsweet prints on silk and silk jersey. Faint but delicate tracery from stems and leaves, I particularly like the flower prints, a spot of iron for each floret. There were only smudges of iron to show where meadowsweet leaves, stems and flowers had been rolled in the wool gauze.

I found dried weld had printed better on wool than silk. The coreopsis flowers left orange/brown blotches on everything and the Dyers Chamomile made yellow ones. Thank heavens for their intense dye content, as the flowers brightened up the entire batch of ecoprints, turning the background of the piece of wool a particularly pretty pale yellow. The greaseproof paper stayed intact throughout the simmering process and did prevent string marks and darker dyes on the outer fabric on those bundles.

Which would Elinor choose to wear to the awards do? After all my efforts to get her some classy ecoprints on expensive silk and on even more expensive wool gauze, she preferred the cheap jersey silk noil that had had the old string leaving iron binding patterns and no protection from an uneven dye in the meadowsweet bath.

"It's offbeat, Beaut. Bizarre. Outre. I just know the cameras will pan in on this one."