 I have been following the Wovember campaign - if you haven't seen it, do have a look, interesting articles have been posted through the month. Of course I wanted to join in with a wool along (WAL), so on the first of the month, I went rooting through my stash of fleeces, wondering how I ever bought so many and consoling myself that my home will be wonderfully well insulated this winter and I can go to bed knowing that hidden underneath me, several rare breed flocks are being supported.
The first fleece I bought in 2014 was an ordinary Blue Texel. Back in May, I posted about washing and skirting it and using the rougher fibres to hook a rug. I have been tripping over three bags full of unfinished project ever since. The bulk of the fleece had been sorted by colour, about a third of the wool had been spun, two skeins much thinner than intended, through talking too much on spinning camp in June. The final bag contained a start on knitting.
I'm very fond of rustic knitwear. Anyone going out in one of my jumpers walks in peril of being rounded up by a sheep dog. This bouncy fleece would be cosy, but on further consideration, spun into a bulky, woollen yarn and knitted into a thick jacket, it was all too easy to imagine the wearer disconcerted by an unexpected check for blowfly.
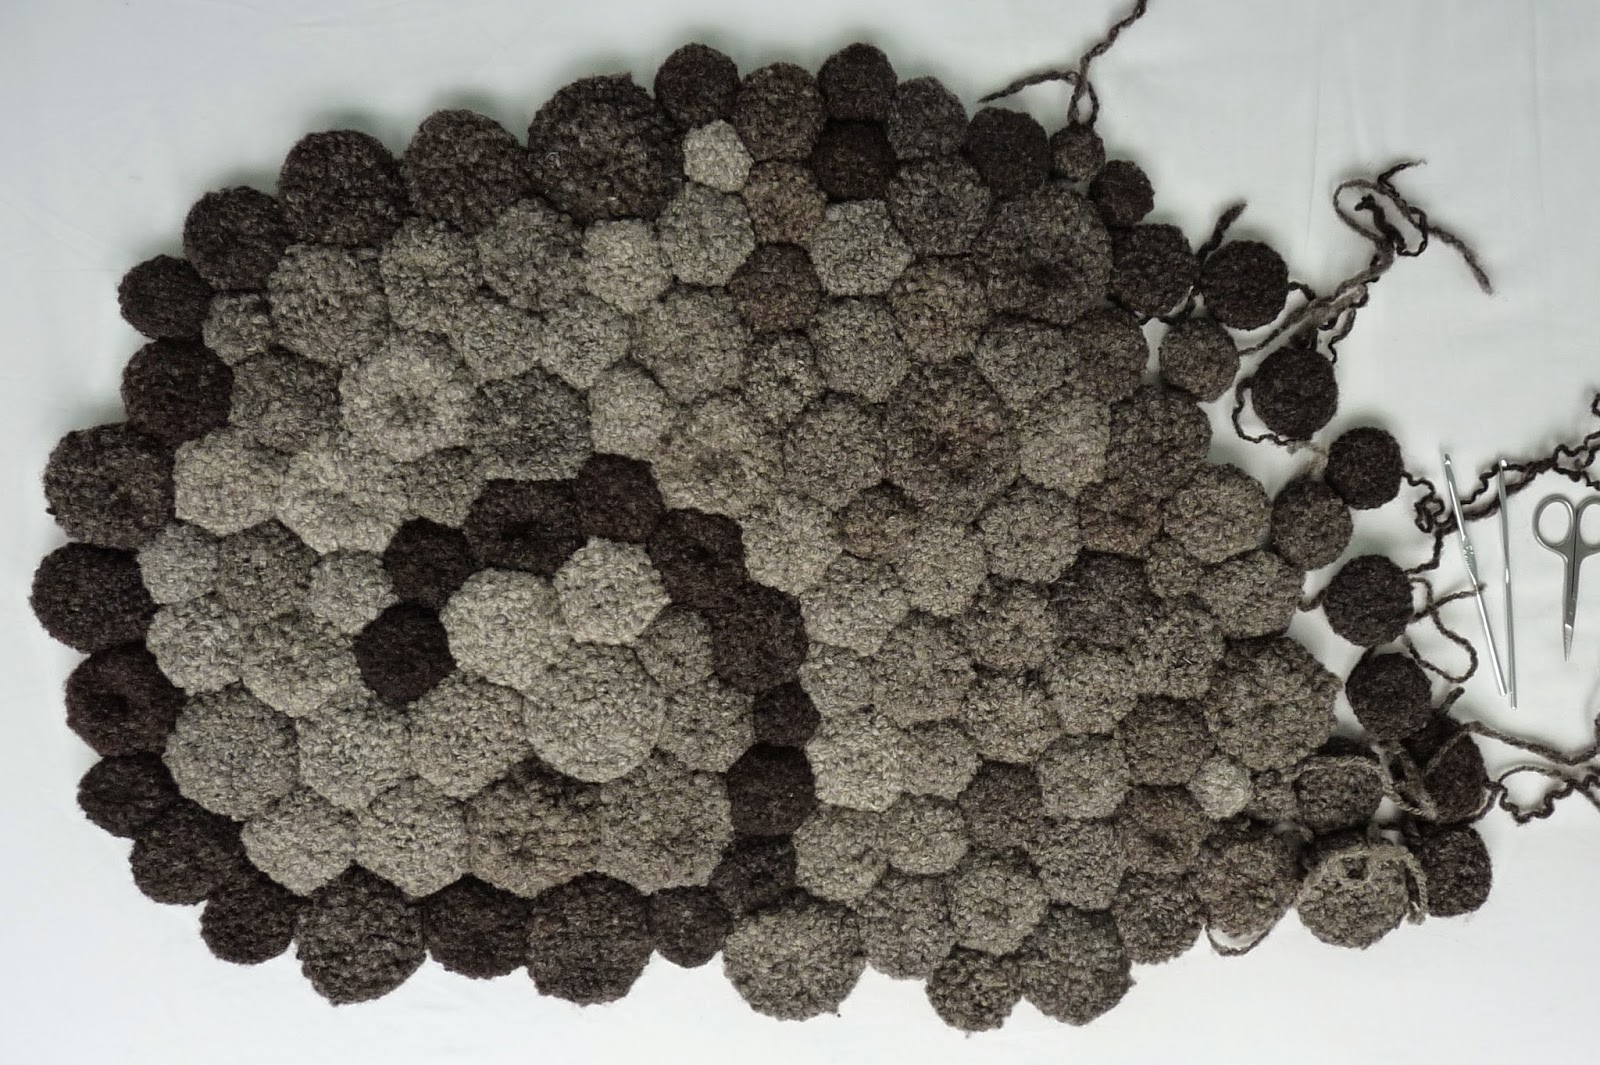
There are limits to my willingness to tempt fortune, but none to my love of dappled fleece colours. Blue Texel is full bodied with a disorganised crimp, which I think makes it a Down-type breed. The staple length varied from 3-7cm, though much longer once put on the hand carder, because the fibres are so elastic. No point fussing about neps in the rolag or twist in the singles, I decided the yarn's greatest quality was its natural grey/brown gradient and resolved to relax and take pleasure in quick, simple
carding and headlong spinning as I pleased. A thick rug would make the most of the warmth and display all the shades. Double crochet creates a firm, tough fabric. Making a patchwork of little cushions should be comfortable underfoot and also meant there would be no need to strive for uniformity when spinning or to stress over the stitch count to crochet constant dimensions.
Each cushion started with a loop and two chain on a crochet hook between 4 and 5.5mm, depending on how chunky the skein of yarn. Six double crochet (US single crochet) stitches were made into the first stitch, bringing the yarn tail in to the centre. Continuing in the same direction, spiralling outwards with no special link at the end of the rounds, the
second round was two double crochet into each of the six stitches. Third round, one double crochet in first stitch, two in the next, one double crochet in the next two stitches, then two in the following stitch and repeat, then one double crochet followed by two double crochet in the twelfth stitch to complete. From the fourth round on, it all got a bit ad hoc,
 typically increasing in every fourth, then every sixth stitch with successive rounds, stopping when happy with the diameter. Filling the cavity loosely with a length of yarn, I reversed the pattern as best I could recall, decreasing instead of increasing till six stitches remained, breaking the yarn and threading it on a needle to sew the centre closed and bring the tail out through one side. Minimal stitch definition means no worries if you stray from the pattern, long as it looks about right.
By 15th November, I was more than half way through spinning the fleece, having unravelled the knitting and crocheted it up. It was a surprise to find each skein of 24 rolags only made between six to ten cushions. A fair sized hearth rug was not on the cards, although the original fleece had covered most of a floor in a modest sized room. I had planned a sort of pixellated image of an oak tree in autumn, but it looked unconvincing.
The Fibonacci spiral is a shape repeated over and over by plants and shells and even galaxies. This article says it has to do with the Golden Ratio of 1.6, though my maths isn't up to a proper comprehension of the numbers on Wikipedia. Copying it, approximately of course, this is how far I got by the WAL photo sumission date of 25 November.
Writing a sentence to send to Wovember about my experience of the project so far, my first thought was that it had taken far longer than expected to produce a much smaller mat. Right behind that idea came a terrible tendency to wax lyrical and as usual, I sploshed right in, getting out a book of Gerald Manley Hopkins poetry, which I find should have been returned to the school library in 1980. Ah well, only two people had taken it out since 1975 and through the marvels of the interweb, now anyone can have a read of Pied Beauty. I name this rug Dappled Thing and rejoice in its landscape, plotted and pieced.
From the sublime to the fastidious. Here it is in action.
One fleece transformed into two matching bathroom mats. Harmonious cushions, if not quite the music of the spheres.
 Hardly had the heating on this autumn, it's been so mild, so far. I've noticed a few trees changing, but Wales seems to have missed out on the classic blaze this year. Checking a favourite sycamore, the remaining leaves were just drab tatters about its branches.
Freshly fallen leaves are supposed to be best for contact dyeing. Last year, I had a go at steaming some in between wet sheets of watercolour paper, pressed under a big stone. Naturally, I picked up the most colourful varieties, expecting they would give the best results. Wrong.
 Nothing from the ivy, speckledy brown from those bright red oval ones, touch of green from the red maple. Most sheets were an obscure mess.
I know leaves only look green when full of chlorophyll and I'd now say chlorophyll does not dye a contact print. Deciduous trees shut down using chlorophyll to photosynthesise energy when the days grow short. All that is left in old autumn leaves is their structural elements and some waste product, so most look dull. Reading around, it seems that the brief but magnificent reds and purples are largely due to the breakdown of residual glucose stores. Such leaves look as if they would give fabulous dye colours, but the ones I tried last year really didn't. Finding out the colours are sugar based might explain this.
Oak leaves are particularly rich in tannin, which may account for why they made the strongest marks with the sharpest detail, but I don't understand why they dyed paper so much better from their undersides, compared to their topsides. The ginkgo leaves did much the same one sided dyeing.
Having an afterbath leftover from a run of Chamomile dyeing, I thought I would try contact printing silk with oak leaves, same method as with geranium leaves.
 The silk was mordanted with alum and soaked before laying on the leaves and rolling it round section of plastic downpipe.

 The string was dunked for a minute in a jar of vinegar with rusty nails at the bottom.
 The oak leaves made an orangey brown print, with the iron producing darker details. Along the edges, the yellow chamomile dye bath had shifted to green with iron seeping out of the string and working as a modifier. The bigger leaves made a pale speckled print. Still wondering, are the oak leaves printing better because of tannin fixing their dye, or are there particular dye molecules at work?
Clearing the borders, I found remnants of dye plants with a bit of life left in them. Rather than the compost heap, they went into the remaining dye bath for a simmer. Ages ago, I bought 10m of tubular silk jersey, thinking it an online bargain, only to find it had a fishy smell I couldn't stand. Apparently, unprocessed silk contains a silk worm gum called sericin which causes this.
My silk noil went through the washing machine twice and had a day on the washing line and still was whiffy when damp, even after I sprayed it with febreeze and mordanted some of it with alum. I cut a 30cm strip and put it though the oak leaf contact dye process in the rebooted dye bath. It had an hour or so simmering, a day soaking and another day drying out.
The oak leaves made an orangey brown print, with the iron producing darker details. Along the edges, the yellow chamomile dye bath had shifted to green with iron seeping out of the string and working as a modifier. The bigger leaves made a pale speckled print. Still wondering, are the oak leaves printing better because of tannin fixing their dye, or are there particular dye molecules at work?
Clearing the borders, I found remnants of dye plants with a bit of life left in them. Rather than the compost heap, they went into the remaining dye bath for a simmer. Ages ago, I bought 10m of tubular silk jersey, thinking it an online bargain, only to find it had a fishy smell I couldn't stand. Apparently, unprocessed silk contains a silk worm gum called sericin which causes this.
My silk noil went through the washing machine twice and had a day on the washing line and still was whiffy when damp, even after I sprayed it with febreeze and mordanted some of it with alum. I cut a 30cm strip and put it though the oak leaf contact dye process in the rebooted dye bath. It had an hour or so simmering, a day soaking and another day drying out.
 After a final wash the smell had gone! The silk jersey isn't very stretchy any more, but at least I know I can live with it.
The tubular scarf looks rather good on, though the prints are fuzzier on this fabric. While freshly fallen oak leaves are still thick on the ground, I had a go at contact printing them on cotton jersey, mordanted with alum acetate. The dye bath was beefed up by simmering a heap of Japanese Indigo plants I had been steeping to eke out the last of the late season indigotin. I've read that this gives pinkish dyes, but who knows what contribution the elderly plants made to the cocktail of oddments in that bath.
 Whatever, there was enough going on in there to provide a soft grey background to my last oak leaf contact dye trial. Putting a double layer of leaves in the roll, half facing up and half facing down, printed both sides of the cloth. Cotton jersey doesn't fray and is warm enough for a scarf.
Three seasonal scarves.
Dyers' Chamomile or Anthemis tinctoria is pretty enough to earn a spot in the sun in any garden. Seeds germinate easily and come on fast in their first year. The flowers are fat yellow buttons which last for weeks. Although they keep blooming from July to early September, the production of new flowers is relatively slow, so the crop from each plant is modest and the long stalks look gnarly if you just pick off the flowerheads. Having a proper clip at the whole plant now and then stops it growing leggy. The foliage is finely divided and tough, slugs don't bother to graze on the leaves, but blackfly have to be rubbed off the stems. Horrible, squishy little sap-sucking beasties.
Last year, I dried Dyers' Chamomile flower heads to keep for winter. After a rather pallid outcome from dyeing with fresh flowers late that summer, I never felt inspired to fetch the bag back out of the drawer. This spring, the plants put on new growth, filled out and flowered nicely. Decided I'd just enjoy looking at them, then one day in late June, seeing dozens of heads perfect for harvesting, I picked the lot. Stuffed them into a solar jar with some alum mordanted fleece and left it on the shelf in the greenhouse. Being one of those things that I didn't have a particular plan for, the jar got left on that shelf til I was clearing down the greenhouse at the end of October.
Emptied the contents into a pail with a clothes peg at the ready. Far from gagging on the stench of festering foliage, I sniffed fresh, fragrant chamomile. What a result. I have had to chuck out honking horror fleece from forgotten jars before now. This wool had picked up a fullbodied yellow colour and the flowers looked little different to when they went in, firm, intact and bright.
Adding some more water, about 50g scoured and alum mordanted fleece was simmered in the pot for a hour. The resulting yellow is warmer than the picture suggests, though not as deep as the solar dyed fleece shown above it. The chamomile flowers still hadn't gone mushy and I happened to have come unstuck using up small balls of wool dyed with Japanese Indigo to
knit another Dragonfly Wings scarf by Boo.
Not my best dye effort. I had already overdyed some mid blue yarn with coreopsis and was doing the lace border in muted green. As is the way of such things, it ran out before the last couple of rows. Rather than finish with deep blue, I put the yarn in the Dyers' Chamomile afterbath with a teaspoon of alum. There was still enough dye in there to turn the blue into green, but once I had actually used the wool, that new green edge looked oh so wrong. Nothing for it but to put the whole scarf in the dye bath for a gentle simmer, hoping there would be enough yellow left to shift the other colours into harmony.

Very pleased, I really did not anticipate the pale blue + yellow giving such a vernal lime. Although my original Dyers' Chamomile plants have now shot their bolt, been uprooted and dug over, next year I shall start some more seeds. In future, the flowerheads will be kept steeping in a jar of water til I have enough for a project. Generations before me were not so daft, there had to be good reason to call this plant Dyers' Chamomile. Much more generous with colour than it first seemed and a positive pot pourri to work with.
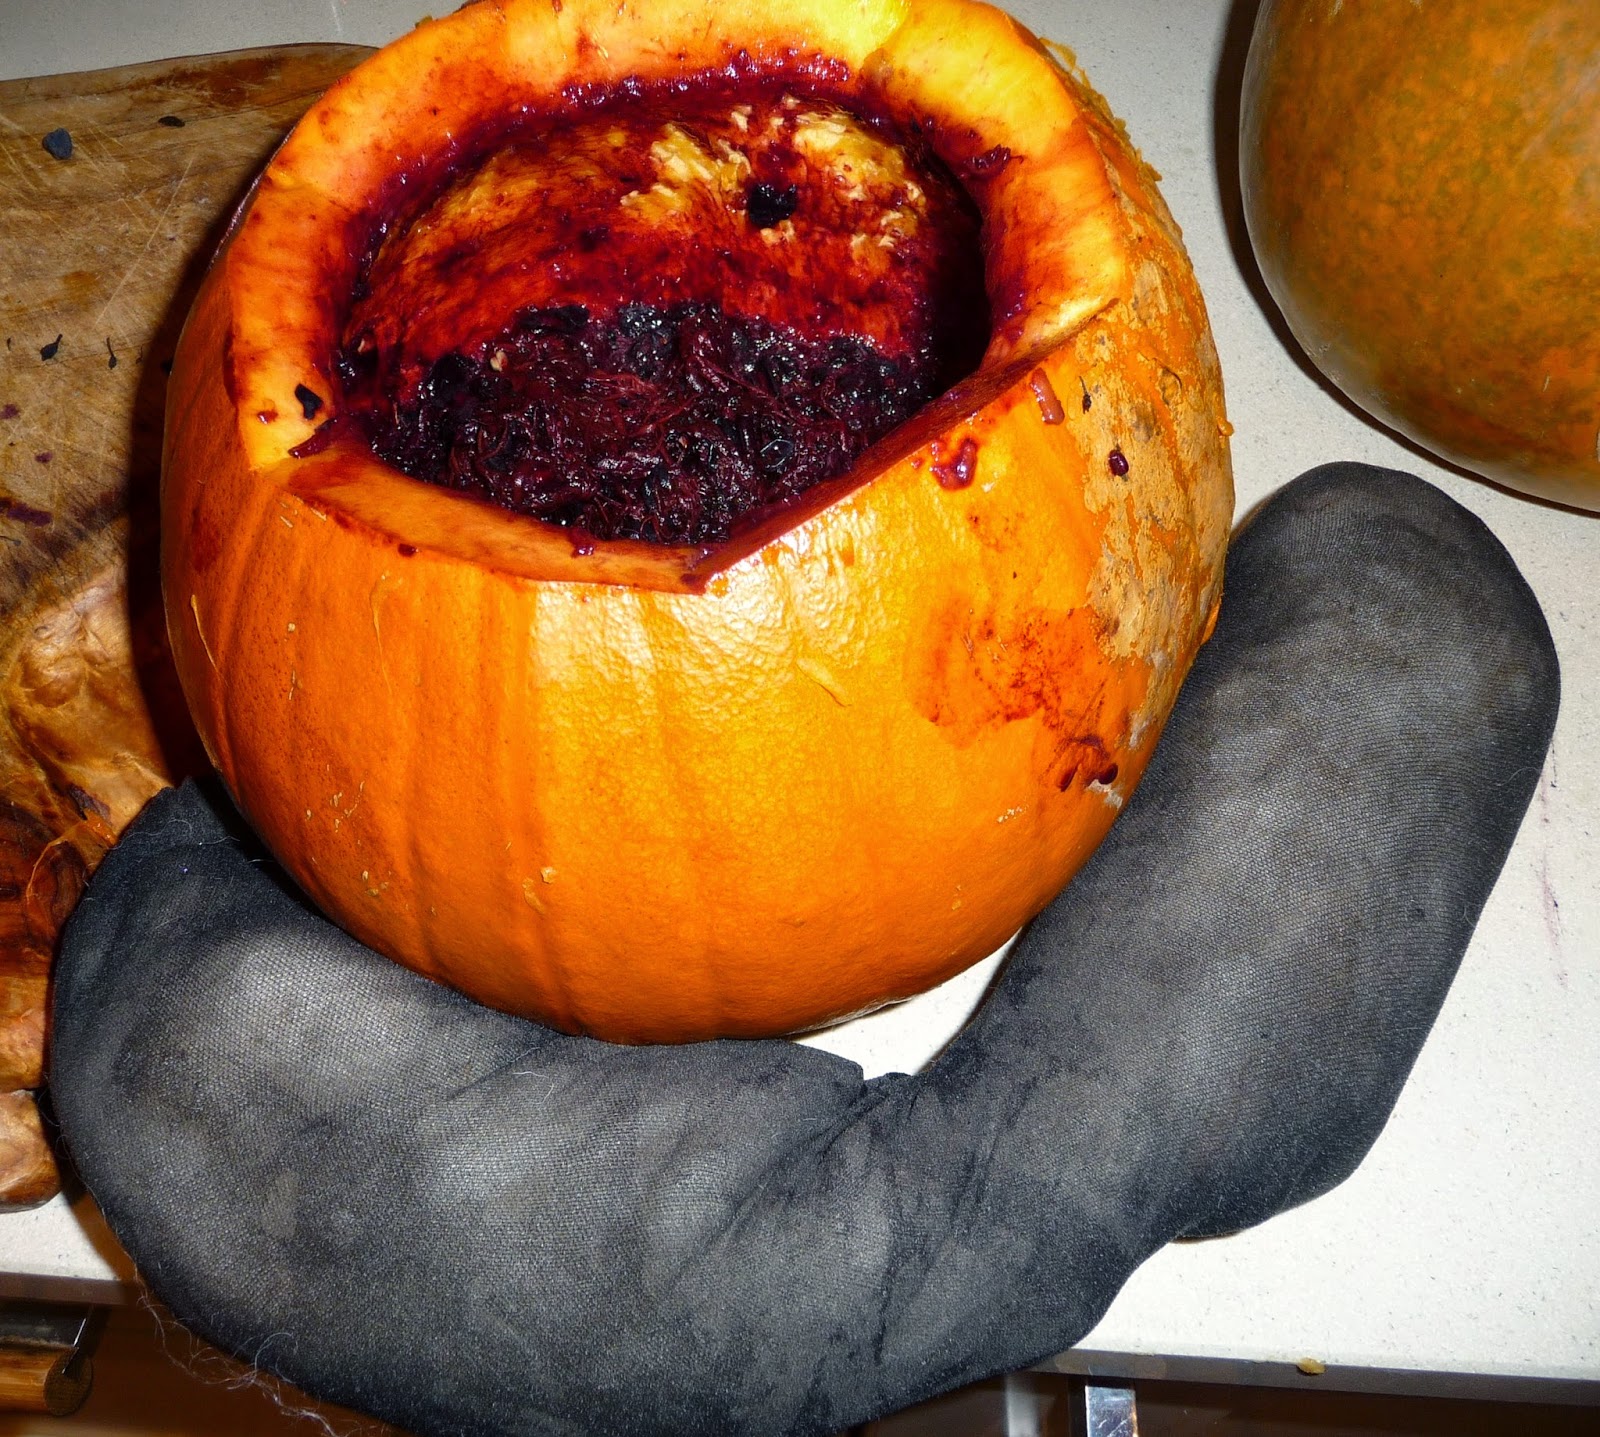
Halloween is the only time of year that supermarkets stock big pumpkins. In America, they fill them with pokeberries to dye woollen yarn vivid purples and pinks. I've heard the colours fade and I know berry dyes are generally a short lived pleasure, but I tried to grow pokeberries anyway this year. Though the seeds germinated, sadly, no berries, the plants have disappeared, as if by magic. Houdini the slug and his lovely assistants. Still, I do have this ornamental vine, Vitis viticella. After the long mild autumn, it is still ablaze with red leaves and laden with little black grapes. The birds haven't eaten them fast enough to stop the patio getting purple splat marks.
Last week, friends on Ravelry were discussing a blog with this method and pumpkins were on sale at two for the price of one. A black cat walked under a ladder and lying in bed, I saw the droppings of three magpies combine to make a Significant Sign on the skylight. Harupsicate or scry, I divined it was time to essay the dark art of pumpkin dyeing. And clean the windows. How this method mordants wool as the same time as dyeing is weird. Maybe pumpkins have a high tannin content, perhaps the vinegar helps release it. The potion for pumpkin one - let's call it Grimalkin - consisted of the guts of the pumpkin squished up with a pound or two of slightly mouldy grapes blended with a cup of vinegar.
Pumpkin two - Pussy - was much tamer, just a cup of water to loosen the same grapes and guts mixture. My test dye subjects were two parcels of scoured white fleece, stuffed into one leg of a pair of tights to stop the fibres getting too choked up with pips and slime. Grimalkin had a sausage of plain fleece, Pussy got fleece mordanted with alum. Encouraged by the stains on my chopping board, I waited four days for the magic to come to fruition.
The inner lining of both pumpkins went soft and the smell certainly got fruitier with successive squishings and turnings. I couldn't really tell what was happening to the wool inside those dark tights, but the juice went a fabulous red/purple. Getting a handful of the contents of these pumpkins would be a
terrific trick for small monsters knocking on our door at Halloween. Total gore. I was sure the lad next door would love it. Himself advised we stick to cellophane wrapped treats, observing that if the mothers down our street found out the origin of the mess, there really would be a bloodbath. While scrubbing the colour off my hands in the bath, I pictured deep purple fleece carded with some silver Gotland, spun up and woven
into art for the blank bit of wall by the shower. Hmm. Turned out I'd been a bit previous.
First picture, the lavender contents of Pussy. Second picture, Grimalkin. The unmordanted fleece does have interesting orangey patches, could be the vinegar was doing something. Maybe I should have left it stewing a bit longer. If only himself had agreed to dance round the pumpkins widdershins, clad only in a weaselskin jockstrap. Unsupportive swine,
such unkind remarks about bonfires and a trip to a pond to find out if I floated. I suppose I shall have to have another go planting pokeberry seeds next spring. Chance is over for 2014 - the pumpkins have disappeared from the supermarket shelves without so much as a puff of blue smoke. I'll leave these two to thaumaturgically transmogrify into compost.