Last July, I made a dye bath by fermenting and simmering a couple of hundred grams of silver birch bark and it dyed all of this.

First into the dye bath was a 25g skein of wool yarn, which came out orange brown, so I added a teaspoon of soda ash to make the bath alkaline and a glug of home made copper acetate solution to bring up better pink tones. A second 25g skein of wool came out a deep red/brown and two small skeins of silk were dyed a paler shade. After that, I used the dye bath as a vehicle for simmering a rolled and tied silk scarf contact print and the exposed silk at the borders went a rather gorgeous version of the same colour. Over the following week, I used the afterbath to provide background colours for plant contact prints on a linen shirt and two cotton frocks, getting successively paler pinks. The wool yarn had had no mordant, but the silk scarf had been mordanted with alum and the cotton and linen had all been mordanted with aluminium acetate in order to take up colours from fresh dye plant leaves and flowers. I can't recall the total weight of materials dyed in that one bath, nor indeed how much bark went in it in the first place, but I was sufficiently impressed to take this picture.
 Lately, I used a whole kilogramme of silver birch bark divided into three dye baths to study the effect of making the naturally acidic pH of a fermenting bark bath more alkaline. By the end of the process, the three baths had dyed a total of 480g unmordanted wool and silk yarn.
Afterwards, the pots sat out on the patio with the bark still lurking at the bottom. A week or so later, I poured all the contents through a colander into a bucket, dumped the bark on the border as a mulch and carried the bucket back to the house.
"You're not hanging on to that mouldy old dyebath, are you, Beaut? It's gone all slimy, you can't put any more wool in there." My companion followed me back to the kitchen and peered into the bucket. "Is that a drowned mouse?"
It was just a floating leaf, though I'll admit, the bark afterbath had become more viscous. It also looked a much deeper red than when it was first made.
"I bet this bucket is still full of dye, Elinor. I bet it will dye loads more stuff."
"I bet it's full of tannin from all that boiling and far too alkaline from all the soda ash you poured in."
Testing with an indicator strip showed the bucket of afterbath, two parts of which had been alkalinised for the first dye session, had become acid again. I added enough soda ash to bring it back to neutral pH 7, which made the colour deeper still, then called Elinor over.
"See, the bark must have gone on fermenting in the pots, the pH had fallen right back down. What a good job I didn't listen to you, you old doom merchant."
My cup of triumph overflowed when another 100g skein of wool yarn had been simmered for an hour and came out pretty much the same pink as the original test skein which was simmered at neutral pH.
"Now watch me dye loads of fabric, I don't even need to mordant anything." Elinor was busy chatting on the phone and just waved me away with a distracted hoof. After a good rummage in the cupboard, I came back downstairs with some offcuts - half a metre of cotton/linen blend curtain fabric in a natural beige and half a metre of white cotton curtain lining. They seemed pretty soggy after half an hour in the sink and appeared to go deep pink as soon as they had submerged in the dye bath. I lit the gas under the dye pot and shot back upstairs to cut half a metre off a heavy canvas curtain I'd been saving.
My companion saw me pass.
"Steady on, Beaut, at least give it a wash. Ych a fi, I can't believe that curtain was put away so grubby. Are you sure it's cotton canvas? Feels a bit stretchy to me." I just carried on cutting off the curtain rings, though I did put the whole thing through a hot wash before putting my cut half metre into the dye bath along with a glug of copper acetate solution. Once all the fabric was hanging up on the airer, I felt entitled to a very smug smile.
"Just think of the lovely pink project bags I can make with that."
"They'll be hand sewn, will they, Beaut? Seeing as how you're too scared to try using the lovely sewing machine your mother left you."
Rather ostentatiously, I put another 100g skein of wool into the dye bath.
"I'll get to it, Elinor, that machine is just more complicated than my old one. This fabric will inspire me."
Lately, I used a whole kilogramme of silver birch bark divided into three dye baths to study the effect of making the naturally acidic pH of a fermenting bark bath more alkaline. By the end of the process, the three baths had dyed a total of 480g unmordanted wool and silk yarn.
Afterwards, the pots sat out on the patio with the bark still lurking at the bottom. A week or so later, I poured all the contents through a colander into a bucket, dumped the bark on the border as a mulch and carried the bucket back to the house.
"You're not hanging on to that mouldy old dyebath, are you, Beaut? It's gone all slimy, you can't put any more wool in there." My companion followed me back to the kitchen and peered into the bucket. "Is that a drowned mouse?"
It was just a floating leaf, though I'll admit, the bark afterbath had become more viscous. It also looked a much deeper red than when it was first made.
"I bet this bucket is still full of dye, Elinor. I bet it will dye loads more stuff."
"I bet it's full of tannin from all that boiling and far too alkaline from all the soda ash you poured in."
Testing with an indicator strip showed the bucket of afterbath, two parts of which had been alkalinised for the first dye session, had become acid again. I added enough soda ash to bring it back to neutral pH 7, which made the colour deeper still, then called Elinor over.
"See, the bark must have gone on fermenting in the pots, the pH had fallen right back down. What a good job I didn't listen to you, you old doom merchant."
My cup of triumph overflowed when another 100g skein of wool yarn had been simmered for an hour and came out pretty much the same pink as the original test skein which was simmered at neutral pH.
"Now watch me dye loads of fabric, I don't even need to mordant anything." Elinor was busy chatting on the phone and just waved me away with a distracted hoof. After a good rummage in the cupboard, I came back downstairs with some offcuts - half a metre of cotton/linen blend curtain fabric in a natural beige and half a metre of white cotton curtain lining. They seemed pretty soggy after half an hour in the sink and appeared to go deep pink as soon as they had submerged in the dye bath. I lit the gas under the dye pot and shot back upstairs to cut half a metre off a heavy canvas curtain I'd been saving.
My companion saw me pass.
"Steady on, Beaut, at least give it a wash. Ych a fi, I can't believe that curtain was put away so grubby. Are you sure it's cotton canvas? Feels a bit stretchy to me." I just carried on cutting off the curtain rings, though I did put the whole thing through a hot wash before putting my cut half metre into the dye bath along with a glug of copper acetate solution. Once all the fabric was hanging up on the airer, I felt entitled to a very smug smile.
"Just think of the lovely pink project bags I can make with that."
"They'll be hand sewn, will they, Beaut? Seeing as how you're too scared to try using the lovely sewing machine your mother left you."
Rather ostentatiously, I put another 100g skein of wool into the dye bath.
"I'll get to it, Elinor, that machine is just more complicated than my old one. This fabric will inspire me."
Only this fabric looked rather odd once I got it down a few days later. The dye was wildly uneven on the cotton and had sat on the humps and disappeared from the creases in the heavy canvas. Worse was to come. When I put it in the sink, the dye flooded back off of it. Usually, if things are left to cure for a few days, relatively little colour is lost on rinsing.
"That rinse water's going to take a while to run clear, Beaut." Elinor sipped her tea. "Doesn't look like the fabric was properly soaked before dyeing."
This was not a great day in the life of Rushworth. Watching another load of dye disappear down the plughole, cutting my losses, I put all the material in the washing machine, then the tumble dryer. That last skein of wool had come out of the bath a very pale version of the first, but in between dyeing the two, much of the colour from the dye bath seemed to have sat on the fabric, rather than fixing to it.
I liked the pink anyway.
"If I add up all the weight of this wool and fabric together with the 480g of yarn I dyed before, that kilogramme of silver birch bark has dyed 1.26 kg of fibres."
Elinor looked at me under her specs.
"Really? You call this last skein of wool 'dyed'?"
"It might look nice in some colourwork."
"It might look nice if it had some colour. So might some of the cotton if you had soaked it thoroughly before dyeing and left it in the pot overnight, instead of rushing about, too cocky by half."
"Hmm, well, I suppose."
I gathered up the fabric and turned to go indoors.
Elinor called after me.
"Let's say, one kilogramme of birch bark could dye one kilogramme of fibres. If you did it properly."
Last month we had some serious storms. On a blowy Sunday, himself and I took the dog out and found a fallen silver birch tree. I was well pleased, took my penknife out and started peeling a branch, himself soon got bored and walked on with the dog.
I went back next day to strip another branch and ended up with a whole kilogram of fresh bark which I shared out between three pots and left to soak for a week. Bark dyes are sensitive to changes in pH and shifting the dye bath pH to alkali is recommended to improve the colour. Unfortunately, alkali does not improve wool fibres, it weakens them and makes them feel rougher.
This seemed a good opportunity to test out how much or how little alkali would get the best results from silver birch bark dye. I dissolved a heaped teaspoonful of soda ash in hot water and added it to one of the three pots of soaking bark peelings, before leaving them all to ferment. The following day, the fluid in the alkaline pot was already much darker.
Snow fell, so I brought the frozen pots indoors. After a week, I tested the contents with Universal Indicator papers. Fermentation had made the two plain pots become acidic, testing at about pH 5. The third pot was still strongly alkaline at pH 9.
I added enough soda ash to bring one of the acidic pots up to neutral pH 7 and simmered them all for an hour before taking out samples to look at the dye bath colours and to double check that the pH had remained the same. The photo shows samples of baths at pH 5, 7 and 9. The deep colour in the alkaline jar looked by far the most promising.
In the meantime, I had been shopping on eBay, looking for some durable chunky wool yarn at a decent price. I was well pleased with my five 100g skeins of British wool from woolbothy. As advertised, they were not smoochy soft, being worsted spun they were sleek and a little stiff, handling more like cotton, but well structured and neither rough nor hairy.
I divided them into ten 50g skeins, gave them a hot soak with detergent to lift off the dressing, then a couple of plain water rinses. No mordant is needed for bark dyes. Three skeins went into each pot for an hour of simmering, then I took one skein out of each pot and boiled the rest, to see whether keeping bark dyes simmering below the boil really mattered.

Here are the results, rinsed in plain water after drying out for a couple of days. In the front row, the skeins that had about an hour simmering, in the back row, the skeins that had a further boil and stayed overnight in the dye pot. On the left, the acidic pH 5 skeins, in the middle, the neutral pH 7 skeins and on the right, the alkaline pH 9 skeins. This is a good strong wool yarn, acid had made the beige skeins smoother while the deep brown yarn from the alkali bath felt slightly roughened, a little squeaky, but still nice enough to handle. All the wool was puffier and softer after washing, dyeing and rinsing than it had been when I first bought it. My conclusions - it is definitely worth testing pH and getting an acidic, fermented bark bath up to neutral before dyeing, but going for a strong alkali is counterproductive, unless you like brown or you are dyeing plant rather than animal fibres. The colours are deeper after boiling and longer steeping, I'd say keeping below the boil isn't critical, though I like the pink from the pH neutral simmer best and I would hesitate to boil a wool that was prone to felting, such as merino.

Having two of each of the deeper dyed skeins, I decided to modify them with copper as I like that better on silver birch than modifying with iron. The final three skeins were heated in a new pot of water with a slug of homemade copper acetate solution - just offcuts of copper piping left in a mixture of water and vinegar. This one has been quietly dissolving all winter and currently has a strong blue.
The copper modified skeins from each pH dye bath are shown in the back row of this picture. Six small skeins of silk were dyed together with the wool and they are shown on top of the front six skeins of wool.
One last and rather important test before embarking on a multicoloured project. I knitted a swatch with three rows of each colour and put it through a 30 degree wool wash cycle in the washing machine using a handwash liquid detergent that is pH neutral. Happily, thorough washing had no ill effects, the colours that had been dyed at different pH stayed just as they were.
Outdoor photography gives a truer impression of the pinkness of birch bark dye. Plus it was fun to tit about with wool in the woods now the days aren't quite so cold.
A couple of weeks ago, I emptied out a whole barrel full of madder plants, which had been growing in there for three years. There were long roots of pencil thickness, lots of thinner rootlets ending in masses of fine fibres, as well as bright yellow shoots running up toward the surface. After washing, the fresh material weighed 2.7kg. I laid out just over 2kg of roots on towels on the spare bed to dry.
I had saved the yellow shoots and the clumps of very fine rootlets more in hope than in expectation that they would contain much alizarin red dye. Once they were washed, I chopped up a portion of each and a little piece of solid root for comparison, poured boiling water over all three and waited a couple of minutes to see what colour would be released. The fine rootlets turned the water the same orange as the big root chunks while the yellow shoots turned red and released a more pinky orange.
Within a week, the roots had shrivelled down to a weight of only 500g. The roots weren't chopped up into small pieces, as is recommended before drying, because in the past, I have had more consistent success using whole root shapes to make red patterns on contact dye bundles than I have had getting good reds out of chopped madder dye baths. I used portions of the fresh harvest for trying out both methods once again.
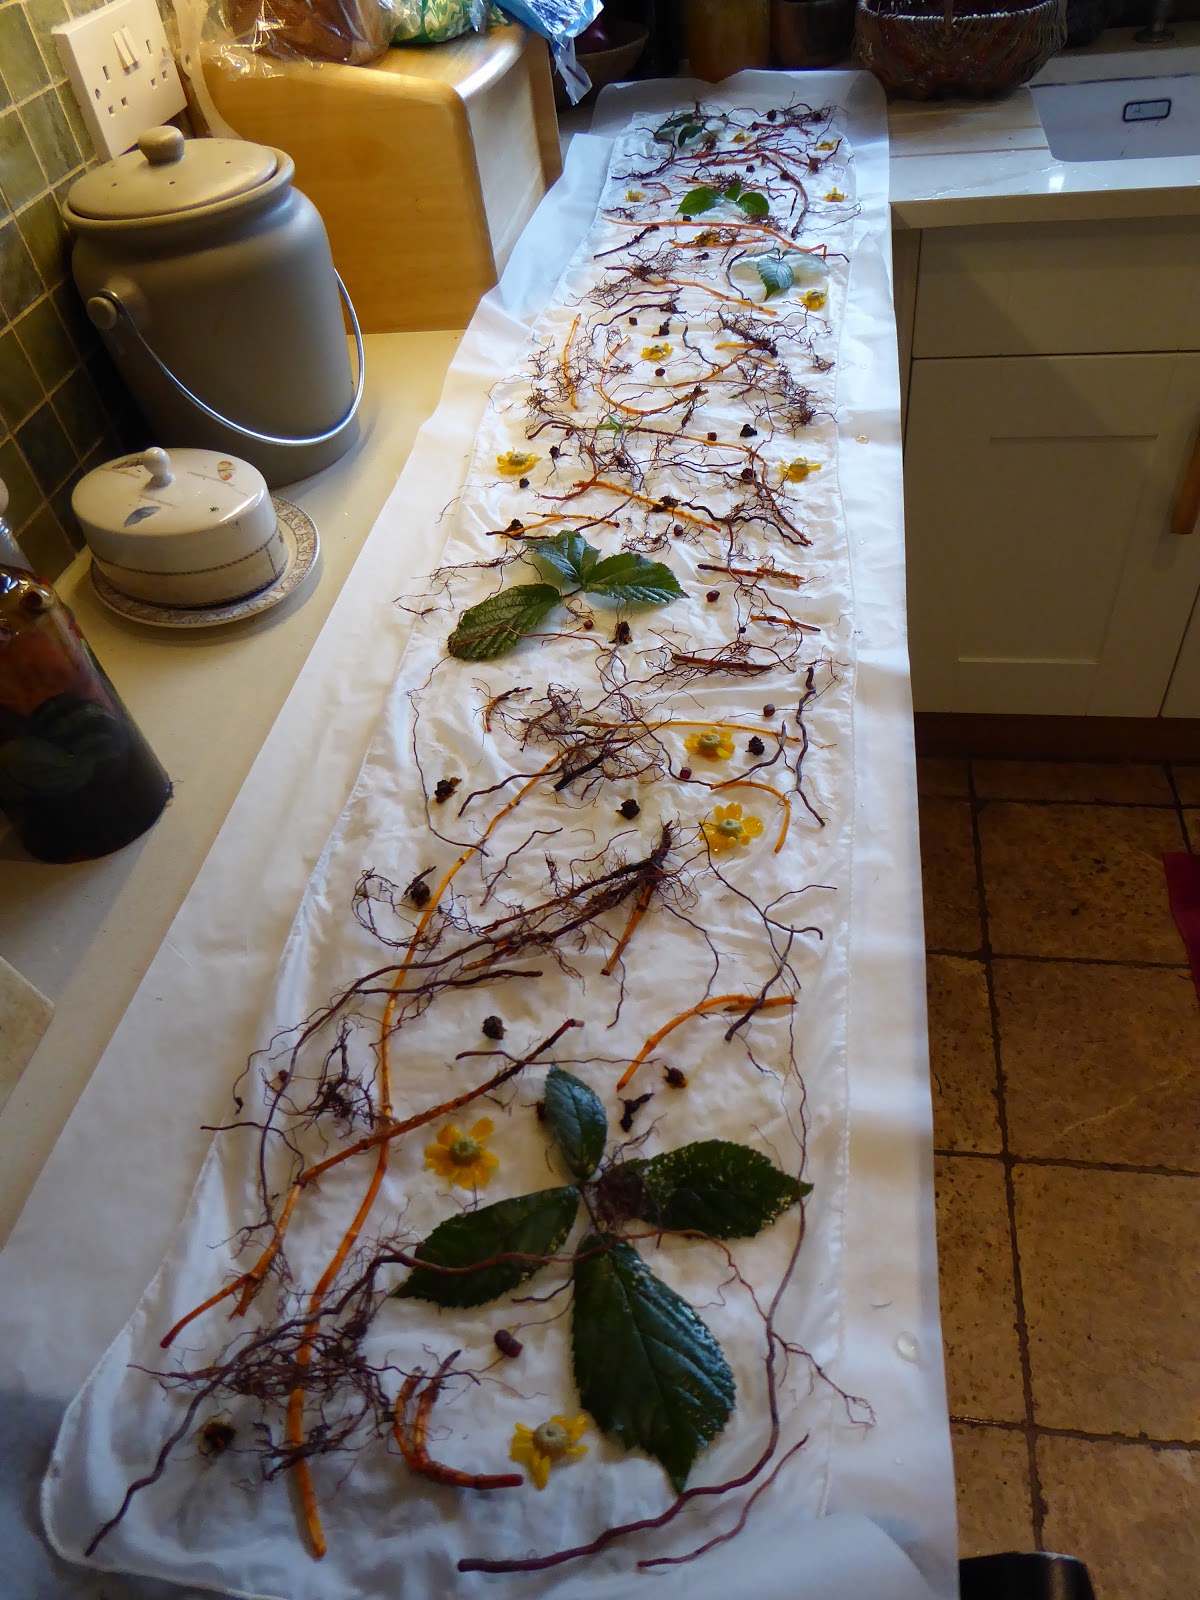
It seems ages since I made my last plant contact dye bundles. These were laid out on a length of baking parchment before rolling, to keep the prints from going right through the layers. With no other fresh dye plant material available, I sprinkled some dried coreopsis tinctoria and dyers chamomile flowers on the fabric along with plenty of the finer madder roots and some madder shoots. Some battered bramble leaves were dipped in iron water and laid on the silk scarf and I added some loose brown onion skins to the wool. Both silk and wool gauze had been mordanted with 10% alum.
Rolled around a plastic drainpipe and tied firmly with string, they were both simmered in plain water for a couple of hours. Containing my curiosity, I left them in the pot overnight and allowed them to dry out for a week before unrolling. .
The wool bundle looked a better red, those yellow shoots giving more scarlet, straighter lines, compared to the darker red of the wriggly rootlets. Onion skin and chamomile provided the orange and yellow splodges, making a really good effect on the wool fabric.
The iron dipped leaves did not make much of a print on the silk, maybe there just wasn't enough life left in them at this time of year. Not sure if the iron darkened the whole silk bundle or the madder colour is simply different on silk. Here are both scarves after washing and ironing.
Meanwhile, I had made a cold madder dye vat in a bucket, using 400g fresh roots and leaving it to keep warm on the underfloor heating in the bathroom. On the sixth day, my companion remarked
"Beaut, it's a good thing you've got a downstairs toilet. Otherwise visitors would think you'd been having a very hard time with the menopause."
I thought I'd ignore that.
"I suppose the vat is getting a bit whiffy, Elinor. I'll take it downstairs and try heating the madder up in a dye pot, see if I can get some more colour out of it." Stumping downstairs with the bucket, I wasn't feeling hopeful. "Even though they were partly brown alpaca in the first place, the pieces of wool tops I've been taking out each day haven't gone a really deep red. Don't know what I'm doing wrong. The vat is fermenting, but I keep adding in more soda ash so it stays alkaline and I'm following exactly the steps I used for my first, most successful attempt at this."
My companion skipped sideways as the bucket sloshed into a dye pot.
"That's not quite true, is it? You've kept all the chopped up roots in that big net bag instead of letting them float in among the fibres."
"Well, there was just that one difference in the method, because I just couldn't face picking endless tiny bits of root out of the tops before spinning them. I'm still going to leave them in the bag while I heat them up now. Watch out for the long thermometer, this pot mustn't go over 80 degrees."
"Next time, dye yarn you've already spun. The bits will come off that easy enough. And do me a favour, no more cold madder vats. A steamy afternoon in the kitchen is one thing, showering next to a blood bath is quite another. Puts me right off my tea."
As if.
Here is the final madder vat outcome.
The top row are the pieces which were taken out of the cold vat at intervals over six days. The middle row were heated to 80 degrees centigrade for an hour with the same roots still in a net bag. The bottom row pieces were heated in the dye bath after the roots had been boiled with a couple of lemons to provide acid, then taken out to the compost heap. Bottom right is an undyed piece of the original alpaca/merino blend tops.
Here are eight 25g lengths of combed wool tops, after each piece had one five minute dip in a Japanese Indigo leaf dye vat. The wool is Captain Poldarles, a blend of white Polwarth and Merino D'Arles bought from John Arbon. The French Merino D'Arles is naturally coloured, so before dyeing, the tops were white streaked with soft shades of brown. Dyeing this gradient relied on the indigo leaf vat getting weaker each time a piece was dipped into it, so the depth of blue diminished with each successive piece. Further to that, you can see the indigo uptake from a single dip was uneven - it usually is, solid colour comes from repeated dips in the vat. Doing several dips and rinses, in the past, I have managed to felt merino fibres beyond rescue.

A little gentle drafting returned these single dipped tops to a smooth alignment ready for spinning. Rather than bemoan a patchy dye result, I was of a mind to spin them into a yarn preserving the broad gradient and making a virtue of the added random colour variation. Commercial wool tops are often so processed the fibres lose all their crimp and become lifeless to spin. John Arbon produces tops with exceptional character which handle beautifully, retaining qualities typical of the sheep breeds. As I admired the tops and pondered on their destiny, I foolishly shared my thoughts with my companion, Elinor Gotland.
"This lush Polwarth and Merino blend is bound to lend itself to fine spinning."
"Fair play, Beaut, you've made more than enough chunky handspun."
"I think I will have a go at getting the yarn thickness down to light fingering weight."
Elinor grabbed my arm and marched me out to the hall.
"The finer the spinning, the higher the twist you'll need to put in. Time you took Sleeping Beauty for another ride."
I bought this Schacht Reeves spinning wheel from a friend about eighteen months ago, dreaming of spinning cashmere longdraw from the cloud with the huge wheel whizzing the flyer round at speeds that Roger, my Ashford Traveller could never reach, even if I pedalled his treadle like Laura Trott in the velodrome. In reality, since last summer's efforts produced an overspun, stringy yarn, the Schacht Reeves has remained an extravagantly ornamental fixture under the stairs.
This time I spun on the lowest ratio, which was 14:1, aiming for two ply light fingering weight rather than three ply. I pulled each section of the tops in half and started with the palest, spinning that then the next palest onto the first bobbin, making a matching bobbin with the remaining halves and plying them together only just beyond the balance.
Though far from perfect, this yarn kept much more body than the last lot. Each of these four 50g skeins changes half way through from one shade of dyed tops to the next and within each shade there are darker and lighter stretches from the uneven dye and within each single, whatever the depth of blue, there is a greater or a lesser proportion of the overdyed natural brown merino fibres.
I sat glued to the computer screen for hours, scrolling through patterns and ignoring pointed remarks about when it might be time for tea and even the dog putting her head on my lap and drooling onto my jeans.
"I have to find just the right project. Light fingering weight yarn at last and I'm dying to see how this gradient knits up."
My companion looked over my shoulder while I was viewing a particularly lovely lace shawl.
"Find a pattern in stocking stitch.The colour of that wool is enough of a hodge podge, knit it into holes and frills and it'll look a right dog's dinner. Which one of us might appreciate, poor starving animal. Just look at those pleading eyes."
"But I like lace knitting and I've spun fine yarn specially."
"To be honest, Beaut, you've run out of people to give shawls to. Enough of the fancy work. Knit something plain that you actually need. And put the kettle on, do."
So I knitted a summer cardigan with three quarter length sleeves using this free pattern from DROPS. Elinor refused to allow me to do it with stripes, so I made each sleeve and the two front pieces staring with a different ball of yarn.
I did add in a little waist and shoulder shaping and a bit of extra width to stop the top button straining and will admit I am chuffed to bits with the fit. There wasn't quite enough indigo yarn left to finish the back, so I had to add in a few rows of off-white near the top. When I spun round to show the cardi off, Elinor was outraged to find I had also eked out the indigo at the bottom by including the off-white yarn in a Fair Isle wave pattern.
"Trust you to sacrifice purity for promiscuity. To add to your many style crimes, that outfit is practically double denim."
Looking back to 2013, when I first sowed madder seeds, it was a good job the plants went into a raised border by a wall. Since then I've discovered that planted anywhere else in my garden, madder plants dwindle away and die in the wet winters with barely a red root to show for their sad existence. Because the first plants flourished in the relatively dry conditions of extra height for drainage in the rain shadow of the wall, they flowered and set seed from their second year onward. After three years, I dug up most of the original plants to make madder root dye. Thanks to the seeds they supplied, many of their offspring still live on.
Sown a centimetre deep into small pots of damp compost in March, I find at least half the seeds saved in autumn will germinate at room temperature and grow on strongly in an unheated greenhouse through April. I must have planted out dozens of little madder plants each May since 2015 and while the ones in garden borders didn't survive, plenty of others have managed ok in containers and their roots have made great contact prints.
From the perspective of the prospective dyer, the true measure of how well a madder plant is doing is hidden under the earth. Last summer, plants in their second year were waiting in plastic pots, some outdoors and some in the greenhouse. From August onward, the greenhouse went unwatered. It is only lately I have faced the sorry sight of dead brown plants.
Madder naturally dies back to the ground in winter, leaving only tough, dry stems. To my great delight, when I tried to pick up the line of madder pots in front of the grow bags, I found they had grown substantial roots through the bottom of their pots to get to what little moisture there was in the gravelly soil below. Forking through the gravel, I even found a surprise harvest of madder roots.
The plastic pots outside got the benefit of rain to water them, yet they have no sign of roots coming through their holes. It seems that once established, madder plants grow more roots the less water they get, even to this extreme. The greenhouse is now cleaned and patched up for the spring and those madder plants are staying inside, potted on into the biggest pots I have - with one good watering to help them over the shock.
Size does matter. This terracotta pot is bigger than a bucket and last June, it contained a madder plant starting its third year. The scrambling stems were taking over the pathway with tiny hooks that catch on clothes. Once turned out, although the mat of yellow fibres on the outer surface suggested the pot would be crammed, the internal root harvest proved less dramatic.
 Below its crown, this two year old plant had long roots going down through the earth to a fine network at the base .
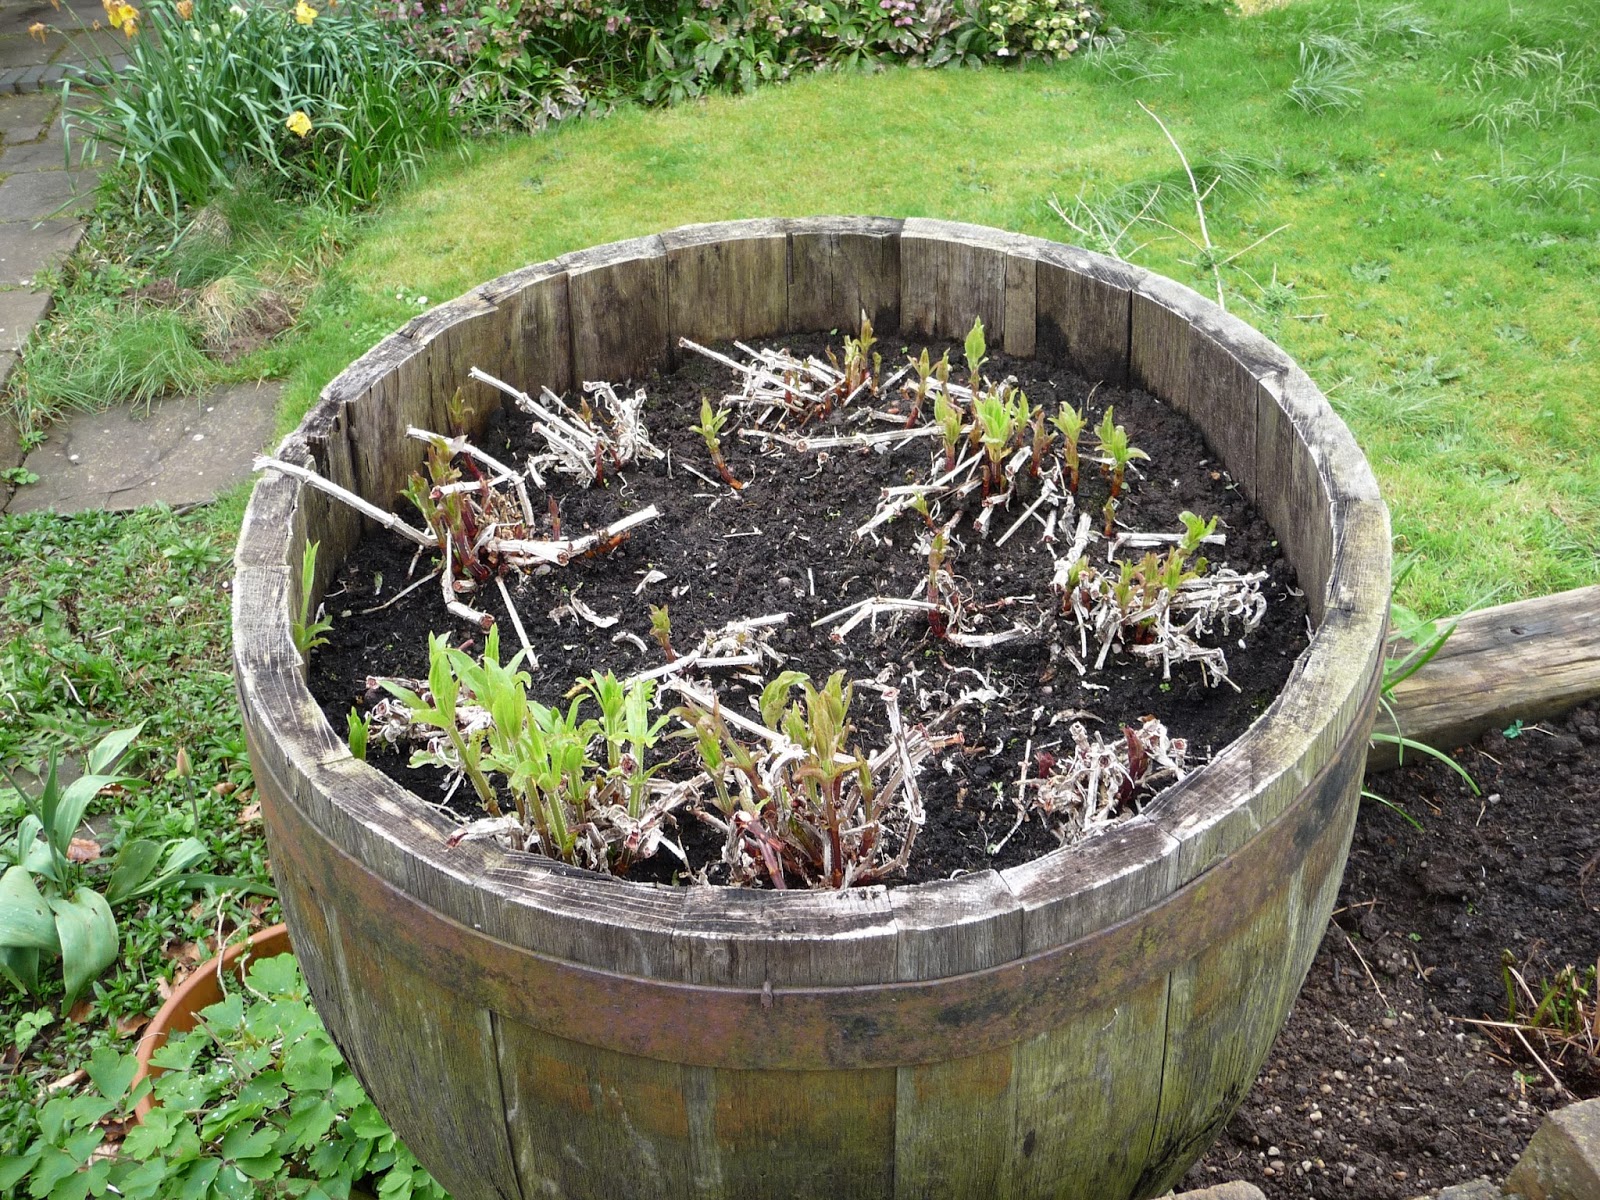
Six other madder plants that started at the same time, in spring 2015, have been growing in an old water butt with its top sawn off. This is how they looked last March, with new shoots just appearing. Summer brought the usual tangle of foliage flopping over the sides, probably less per plant than was sprouted out by the lone madder in its terracotta pot.
Realising these were now exactly three years old, I decided to find out how well conditions in a 50 gallon wooden container had suited them. Last weekend, braving freezing winds, I spent all afternoon emptying out the entire barrel. After chiselling out the dormant crowns, hopefully with enough roots attached to keep them alive, I dug down layer by layer.
All the soil was dry and friable, easy to shake off. There were yellow shoots as well as big red roots near the top. Deeper in, many thick roots ran all the way down to a riot of yellow rootlets encasing the broken bricks which filled the base. The soil at the bottom was the only damp area and it was finger numbingly cold to sift through, time to go indoors and warm my hands on a mug of tea.
The following day, I stayed in the kitchen for a massive root rinsing exercise. The wet weight of the madder barrel harvest was 2.7kg. The clean roots have been laid out in the spare bedroom on towels to dry and I expect the final weight of madder to store will reduce to only a few hundred grammes. Still, I have read that the alizarin red dye the dry roots contain actually improves after keeping them a couple of months.
Below its crown, this two year old plant had long roots going down through the earth to a fine network at the base .
Six other madder plants that started at the same time, in spring 2015, have been growing in an old water butt with its top sawn off. This is how they looked last March, with new shoots just appearing. Summer brought the usual tangle of foliage flopping over the sides, probably less per plant than was sprouted out by the lone madder in its terracotta pot.
Realising these were now exactly three years old, I decided to find out how well conditions in a 50 gallon wooden container had suited them. Last weekend, braving freezing winds, I spent all afternoon emptying out the entire barrel. After chiselling out the dormant crowns, hopefully with enough roots attached to keep them alive, I dug down layer by layer.
All the soil was dry and friable, easy to shake off. There were yellow shoots as well as big red roots near the top. Deeper in, many thick roots ran all the way down to a riot of yellow rootlets encasing the broken bricks which filled the base. The soil at the bottom was the only damp area and it was finger numbingly cold to sift through, time to go indoors and warm my hands on a mug of tea.
The following day, I stayed in the kitchen for a massive root rinsing exercise. The wet weight of the madder barrel harvest was 2.7kg. The clean roots have been laid out in the spare bedroom on towels to dry and I expect the final weight of madder to store will reduce to only a few hundred grammes. Still, I have read that the alizarin red dye the dry roots contain actually improves after keeping them a couple of months.
All this leads me to conclude that on a clay soil in rainy South Wales, the best madder root harvest comes from planting in the deepest possible, porous container and not bothering to water it once the young plants are established. My plan for the spring is to buy two big wooden wine barrels, drill several holes in their bases, add plenty of crocks and bricks to help drainage and set them alongside the old water butt on raised plinths in the front garden, where they will get the afternoon sun.
I think I shall do just as I did with the original water butt, half fill them with rotted sheep manure, add some handfuls of wood ash to alkalinise the soil and top up with compost. With a bit of luck, replanting two big crowns into each of three barrels will mean much faster root growth than starting with new seedlings. Though the weather is savagely cold, here is a picture of May to remind me how fast the garden will soon be changing.
Today was a good day for putting on a sheepskin coat, walking the dog in the snow, thinking about the story so far, for garden planning and for dreaming. How very nice it is to be retired, not to have to struggle in to work, but light the fire and stay indoors.
 Afterwards, the pots sat out on the patio with the bark still lurking at the bottom. A week or so later, I poured all the contents through a colander into a bucket, dumped the bark on the border as a mulch and carried the bucket back to the house.
 Testing with an indicator strip showed the bucket of afterbath, two parts of which had been alkalinised for the first dye session, had become acid again. I added enough soda ash to bring it back to neutral pH 7, which made the colour deeper still, then called Elinor over.
 My cup of triumph overflowed when another 100g skein of wool yarn had been simmered for an hour and came out pretty much the same pink as the original test skein which was simmered at neutral pH.
  "Steady on, Beaut, at least give it a wash. Ych a fi, I can't believe that curtain was put away so grubby. Are you sure it's cotton canvas? Feels a bit stretchy to me." I just carried on cutting off the curtain rings, though I did put the whole thing through a hot wash before putting my cut half metre into the dye bath along with a glug of copper acetate solution. Once all the fabric was hanging up on the airer, I felt entitled to a very smug smile.
 Only this fabric looked rather odd once I got it down a few days later. The dye was wildly uneven on the cotton and had sat on the humps and disappeared from the creases in the heavy canvas. Worse was to come. When I put it in the sink, the dye flooded back off of it. Usually, if things are left to cure for a few days, relatively little colour is lost on rinsing.
 "That rinse water's going to take a while to run clear, Beaut." Elinor sipped her tea. "Doesn't look like the fabric was properly soaked before dyeing."
 I liked the pink anyway.
 Lately, I used a whole kilogramme of silver birch bark divided into three dye baths to study the effect of making the naturally acidic pH of a fermenting bark bath more alkaline. By the end of the process, the three baths had dyed a total of 480g unmordanted wool and silk yarn.