The Sheep Soap on a Rope is my latest craft product. It's a bit more of a faff to make than the original version, but as before, it was inspired by a misfortune which befell my dear companion.
I didn't see Elinor coming into the kitchen. I didn't hear her tapping her hoof. I didn't sense her mounting irritation. Happily oblivious, I was standing at the sink, massaging merino wool round a bar of soap, staring out the window thinking of nothing in particular. I started when she jogged my elbow.
"Gone OCD have you, Beaut? Developed a personal hygiene fetish?"
It took me a minute to catch on.
"Felted soaps on ropes are in demand down the craft shop, Elinor. I ought to thank you for giving me the idea."
"Glad you like them."
 Elinor leaned against the taps watching me, til I felt obliged to converse.
"I enjoy felting them even more now I'm using organic Welsh soap - it's got beeswax and honey and herbs in it. Go on, have a sniff of this."
"Mmm, rosemary. No wonder you're acting like a tranquillised elephant." Elinor jabbed my hand with her hoof. "Wake up, Nelly. I'm sorry I ever mentioned felting soap now. This is so dull and unimaginative."
"Oh, do let me be." I elbowed her out of the way to plunge my felting into cold water. It was absolutely not my fault that Elinor fell in too and came up clinging to the rope on the soap. It was a selfless act of inspiration, she is my muse, my singing, dancing, tragically sodden Melpomene.
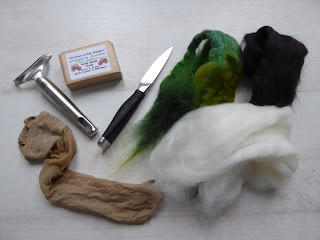
If you too would like to make a slightly more imaginative felted soap on a rope and you can spin your own yarn, here are the things you will need. If you don't spin, you can substitute thick wool yarn in green and black for the green and black wool tops. It has to be real wool yarn, in order to felt into the white merino covering.
If you are a spinner, spin about 10m of a single with Z twist, about the right thickness for two ply double knitting yarn. Navajo S ply the single with lots of extra twist, then Navajo Z ply the resulting yarn back to the balance, so that you end up with about one metre of densely braided yarn in both green and black.
Choose a nice lathery soap. Scrape the edges of the bar to round them off, using a knife or a potato peeler. Sharp corners are liable to be rubbed bare of wool during the felting process.
Cut a groove into the edges of the bar of soap in the middle of all four sides and on the long sides, also at one quarter and three quarters of the way along.
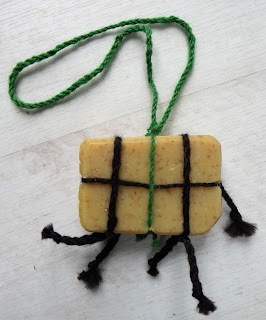
Tie the black yarn around the long axis of the soap, knotting it within the groove at one end with a loop, which can be cut leaving three ends to plait into a tail.
Make a knot at the end of the remaining black yarn, wrap it round the short axis of the soap and tie inside a groove, leaving a short length loose at either end to form two legs with knots for hooves. Repeat to make the other pair of legs.
Make a double overhand knot to create a loop of the green yarn at the length you would like the rope to suspend the soap. Pull the loop knot firmly against the groove at the top centre while you tie the green yarn with a knot lying in the groove at the bottom of the soap.
Divide the white merino tops into two long strips and draft them out slightly. Wrap the first piece round the soap longways and wrap the second piece with the fibres running at right angles to the first, making small gaps to pull through the legs, tail and loop.
Hold the wool tops in position while you stretch the toe of a pair of nylon tights around the soap. Wet it under the hot tap and press the wool down against the soap, then start to massage the wool flat. After a couple of minutes, peel off the tights.
The white merino will only have made a loose jacket round the soap, but the legs and tail are liable to get felted into it. Now is the time to rinse off the lather, free them up and continue rubbing the soap between your hands, making sure the yarn doesn't get bound back into the white body.
Plunging the soap from under the hot tap into a bowl of cold water helps to tighten up the felt. It takes about ten minutes rubbing and plunging to create a solid wool covering, at which point, you can squeeze off most of the water into a towel.
I've discovered that if you needlefelt the decorations straight away, while the soap is still damp, it's much easier to poke wool fibres into the soft surface and the needle is much less likely to snap. A 38 gauge star needle works better than the finer triangular needles.
I didn't see Elinor coming into the kitchen. I didn't hear her tapping her hoof. I didn't sense her mounting irritation. Happily oblivious, I was standing at the sink, massaging merino wool round a bar of soap, staring out the window thinking of nothing in particular. I started when she jogged my elbow.
"Gone OCD have you, Beaut? Developed a personal hygiene fetish?"
It took me a minute to catch on.
"Felted soaps on ropes are in demand down the craft shop, Elinor. I ought to thank you for giving me the idea."
"Glad you like them."
 Elinor leaned against the taps watching me, til I felt obliged to converse.
"I enjoy felting them even more now I'm using organic Welsh soap - it's got beeswax and honey and herbs in it. Go on, have a sniff of this."
"Mmm, rosemary. No wonder you're acting like a tranquillised elephant." Elinor jabbed my hand with her hoof. "Wake up, Nelly. I'm sorry I ever mentioned felting soap now. This is so dull and unimaginative."
"Oh, do let me be." I elbowed her out of the way to plunge my felting into cold water. It was absolutely not my fault that Elinor fell in too and came up clinging to the rope on the soap. It was a selfless act of inspiration, she is my muse, my singing, dancing, tragically sodden Melpomene.
If you too would like to make a slightly more imaginative felted soap on a rope and you can spin your own yarn, here are the things you will need. If you don't spin, you can substitute thick wool yarn in green and black for the green and black wool tops. It has to be real wool yarn, in order to felt into the white merino covering.
If you are a spinner, spin about 10m of a single with Z twist, about the right thickness for two ply double knitting yarn. Navajo S ply the single with lots of extra twist, then Navajo Z ply the resulting yarn back to the balance, so that you end up with about one metre of densely braided yarn in both green and black.
Choose a nice lathery soap. Scrape the edges of the bar to round them off, using a knife or a potato peeler. Sharp corners are liable to be rubbed bare of wool during the felting process.
Cut a groove into the edges of the bar of soap in the middle of all four sides and on the long sides, also at one quarter and three quarters of the way along.
Tie the black yarn around the long axis of the soap, knotting it within the groove at one end with a loop, which can be cut leaving three ends to plait into a tail.
Make a knot at the end of the remaining black yarn, wrap it round the short axis of the soap and tie inside a groove, leaving a short length loose at either end to form two legs with knots for hooves. Repeat to make the other pair of legs.
Make a double overhand knot to create a loop of the green yarn at the length you would like the rope to suspend the soap. Pull the loop knot firmly against the groove at the top centre while you tie the green yarn with a knot lying in the groove at the bottom of the soap.
Divide the white merino tops into two long strips and draft them out slightly. Wrap the first piece round the soap longways and wrap the second piece with the fibres running at right angles to the first, making small gaps to pull through the legs, tail and loop.
Hold the wool tops in position while you stretch the toe of a pair of nylon tights around the soap. Wet it under the hot tap and press the wool down against the soap, then start to massage the wool flat. After a couple of minutes, peel off the tights.
The white merino will only have made a loose jacket round the soap, but the legs and tail are liable to get felted into it. Now is the time to rinse off the lather, free them up and continue rubbing the soap between your hands, making sure the yarn doesn't get bound back into the white body.
Plunging the soap from under the hot tap into a bowl of cold water helps to tighten up the felt. It takes about ten minutes rubbing and plunging to create a solid wool covering, at which point, you can squeeze off most of the water into a towel.
I've discovered that if you needlefelt the decorations straight away, while the soap is still damp, it's much easier to poke wool fibres into the soft surface and the needle is much less likely to snap. A 38 gauge star needle works better than the finer triangular needles.
Leave your finished sheep soap on a rope on the radiator to dry.


