Friday, 26 February 2016

Hand Spinning Camel and Qiviut

The postman brought more parcels this week.  One for me and one for my companion, Elinor Gotland.  Both of us had been harbouring great expectations.  Mine concerned the Travelling Goodie Box, I've been following its progress on the UK Spinners Forum on Ravelry and knew it was due to arrive at my house.  Brilliant idea, a box the maximum size for small parcel postage, filled with fibre-type delights by the genius who dreamed up the original concept, is now being sent round a group of signed up participants.  Each of us is allowed to take out as much fibre as we like, replacing it with stuff of similar quantity and value from our own stash, before posting the box to the next spinner on the list.  By the time it gets back to the original spinner, the fibre inside will be completely different.

Presently, while there is all sorts of stuff in there, I mustn't spoil the surprise for those further down the list. Suffice to say, these luxury fibres proved irrestible.  From the top centre, I took from the box a bag of washed locks of Cotswold (a pricey fleece I have hesitated to buy), sari silk, which should make any dull batt of wool much more exciting, then camel tops and qiviut, finishing with some richly coloured silk.  
Elinor was equally absorbed by her new book.  When I emptied the Travelling Box across the kitchen table, she got in huff about me taking up all the space when some people were trying to read and flounced off to the sitting room.  I followed some time later with a peace offering.
"What's it about, then, this book?"
"Put my tea down over there.  I don't want cup rings on the pages."
I stooped to read the title.
"'The Argonautica'?  Oh, I know, that's the one about Jason, sailing off after the Golden Fleece.  Why is there a clock on the front?"
"It takes time to savour the 1863 edition, translated by Coleridge." Elinor pushed her specs back up her nose and gave me a superior look. 
"Ooooo, fancy - how ever did you get hold of that?"
"I had an original copy printed off by a specialist company, Beaut.  Took a while, but it's bound to be worth the wait.  See, they've even included the page with the Cornell University Library stamp."
"Marvellous.  I might just sit in here with you, do a bit of spinning."
"If you must.  Just keep your fluff off the sofa and no greasy fingers on my book."


Qiviut.  I'd not heard the word, but I must remember it for our next game of scrabble.  Examining my sample taken from the Travelling Box, the fibres were incredibly light to handle and consisted of the finest, dark hairs amongst a short stapled, grey and brown down, so soft I could barely feel it between my fingers.
Reading up online, the word is pronounced kee vee ut and refers to the undercoat of the musk ox.  I have met ordinary oxen and can only speculate how people manage to shear their vests off.  No wonder qiviut is hard to get hold of and costs a fortune.  Various websites declared it to be eight times warmer than wool and finer than cashmere, but gave no practical information on how to get the spinning right.  Elinor and I sat for some hours in silent concentration .


To my delight, qiviut is a dream to spin laceweight.  I guess the longer hairs help hold it together.  Fluffing out a pinch of fibre in my hand and pedalling the spinning wheel madly on the 15:1 ratio, after a little practice, I could draft out from the cloud an inch at a time and spin a single that didn't fall apart the way my fine wool singles tend to do.  Two plied and washed, I got 30m yarn out of four grammes, which must be a personal best. While surprisingly tough to break, the haze that blooms about the central thread makes qiviut exceptionally lush to the touch.
"Will you give over patting and stroking and sniffing that wool, Beaut?"
"Would you like a feel, Elinor?"
"I would not."
"Your loss.  How are you getting on with the book?"
"In the classic style, the story begins with the gathering of the Argonauts, telling of their illustrious parentage and mighty deeds.  I'll admit, so far, it is a little short on narrative drag."
"More tea?"
"Don't mind if I do."


Camels do not bring to my mind smoochy comfort.  I once spent a week travelling across the Thar desert and my recollections include an arse too painful to sit down at all, the first evening.  As a camel of strong character, Kunza took no crap from me and while she had my respect and gratitude, cuddles were never part of our relationship. Though I'm pretty sure the thick, hairy saddle blankets we slept under to keep the sandstorms out were made of camel fibre, I've racked my brains and found no memories of supersoft fluff. Having a look at pictures on Wikipedia, I realised Kunza was just not that kind of camel. The silky undercoat we spin is taken from Bactrians, when they moult.


The Travelling Box held a substantial bag of combed camel tops, golden brown gossamer-like fibres only a couple of centimetres long. Drafting them out in strips, I treadled away at spinning fingering weight two ply yarn in worsted style, after an epic fail at carding tiny rolags to spin longdraw.


Once I had the skeins washed, fulled and dried, Elinor did agree to go and have a squeeze of my luxury yarns. When I went to find out what she thought, it looked like she was enjoying my Golden Fleece more than the one in her book.


Friday, 19 February 2016

Dyeing Wool with Dried Double Maroon Hollyhocks

The colours that come out of a sequence of afterbaths when dyeing with fresh double maroon hollyhock flowers remind me of the sea.  Previously, trying to preserve spare flowers by freezing them seemed to kill off the blues, leaving only greens and greys.  After dyeing the skeins in this photo with fresh flowers, while my plants carried on blossoming last summer, I laid the spent petals on a tea towel to let them
dessicate before being put in a paper bag.  In January, with a design in mind to weave a wave, I put my last couple of hundred grams of scoured Speckled Face Beulah fleece in the bath to mordant with alum for 24 hours, while my stock of 50 shrivelled hollyhocks soaked in plain water. Next day, the fluid had turned deep maroon, much like the original colour of the flowers.


The flowers had half an hour at a very gentle simmer, as boiling destroys the blue pigments, just like freezing.  For such fragile molecules, once you have them fixed onto wool, I have found the colours surprisingly light and wash fast. Sieving petals out and slopping them into a net bag to stay in the dye bath, I added about 50g of wet, alum mordanted fleece for an hour's simmer and an overnight soak.  The wool turned a familiar blue, though not as deep a colour as fresh flowers have offered.
Repeating the process with four more portions of 50g fleece showed that drying the double maroon hollyhocks had preserved a muted version of their original colourway, better than frozen ones did.  Combing condensed the shades - this is flash photography, not quite true to the real appearance, but you can see how the blue tones change, rather than just getting paler.  
Spun worsted and Navajo plied, hopefully, you can just about see colour changes in each strand of yarn on the niddy noddy.  Making mixtures of fleece shades on the hand carders and spinning rolags into chunky two ply gave the adjacent, irregular, puffier yarn a more uniform colour .  I have been building another driftwood triloom.  Since reading a comment made about the last one, ideas have been washing around my mind about harps and harpies, wondering, did those lethal sirens sing intending to lure ships onto the rocks or was their song an end in itself? Winding my yarns around the pegs, the colour changes were too subtle to give the sea weave any unwanted tartan effect and the heavier, loftier yarn seemed a better base to needlefelt into.  So, the final yarn 
construction went three rolags of each shade in turn, spun longdraw and Navajo plied.  
To add emphasis where the sea weave wrapped round the nails on the plank symbolising shipwreck, I dissolved soda ash to make an alkaline solution and painted it onto the wool.  Bit of a potch to get the dry fibres to soak it up from the brush, still, the resulting green colour shift exploited this dye's pH sensitivity.

My harpist or harpy was constructed same way as the small fairies, except using a whole batt of drumcarded fleece for a long full skirt.  A florists's wire running down from the head meant it could be held in a Fibonacci curve; carded, Down-type Beulah fleece did needlefelt onto the woven yarn with all the volume and texture that merino tops lack, yet my efforts dyeing blues from maroon hollyhocks lacked the weight of the sea I had imagined.  Standing back to see the final effect, I had to acknowledge these soft colours from dried flowers do lack the definition I had from dyeing with fresh material.

"Perhaps the pale green you chose to decorate this sitting room has sapped their strength. Didn't like to say at the time, but this green never was a cheery choice."
Sod it.  I got out the roller and painted the back wall white.  It took three coats.  
Once I had hung the loom up again, my companion, Elinor Gotland, eyed it critically.
"Fair play, the room is less gloomy, bit of a shame your harpist still looks like a triangle of mist."
I scraped flakes of white emulsion off my nails.
"Mist might be dangerous enough at sea, but nebulous risk is not my idea of what harpies are about.  How can I give her the inexorable power of a big breaker?"

Asking a Gotland sheep for advice got me a predictable answer. Grey Gotland locks dyed with woad did add lustre, body and depth of blue.  Hooray for a considerable stash of past experimentally dyed fleece and even more hooray that I have got organised enough to find stuff.  
"Loving the fish, Beaut."  
I knew my companion would appreciate a little drama.


"Now she's a 'Belle Dame sans Merci', isn't she, Elinor?"
"Aye, doing her own thing without consideration for others.  Don't you go getting ideas, Beaut, that's no way for a middle aged woman to live."
"Ha, you're just worried you might have to start making your own cups of tea.  This could be the end of your days as Belle de Laine Sans Souci." 

Friday, 12 February 2016

How to Knit Socks that Fit - Book Review

"Ooh, look Elinor, Storey Publishing have sent me another book to review."
Having hurried to see what the postman had brought, my companion now turned on her hoof and sauntered back to the kitchen.
"What's this one about, then?  A Wool Liker's Guide to the Galaxy?"
"Good title, I'd read that."  I finished pulling off the cardboard wrapper.  "No. This book is much more down to earth and just what I need. 'How to Knit Socks that Fit.' by Donna Druchunas."
"Somebody at Storey must have seen that last pair you made."
"Were you expecting a parcel?"
"Oh, nothing as special as a 'Book for Self-Reliance."

Ignoring Elinor's sarcasm, I settled down to read. This book really had arrived at the right moment.  I totally agreed with the first paragraph, comfort is the top reason to knit your own socks, only jibbing at bit at the bottom of page one where it says 'Socks are also a lot fun to make.'  With a lifetime total of knitting four pairs of cuff down socks, I have always needed long recovery intervals, exhausted by the battle against second sock syndrome.  
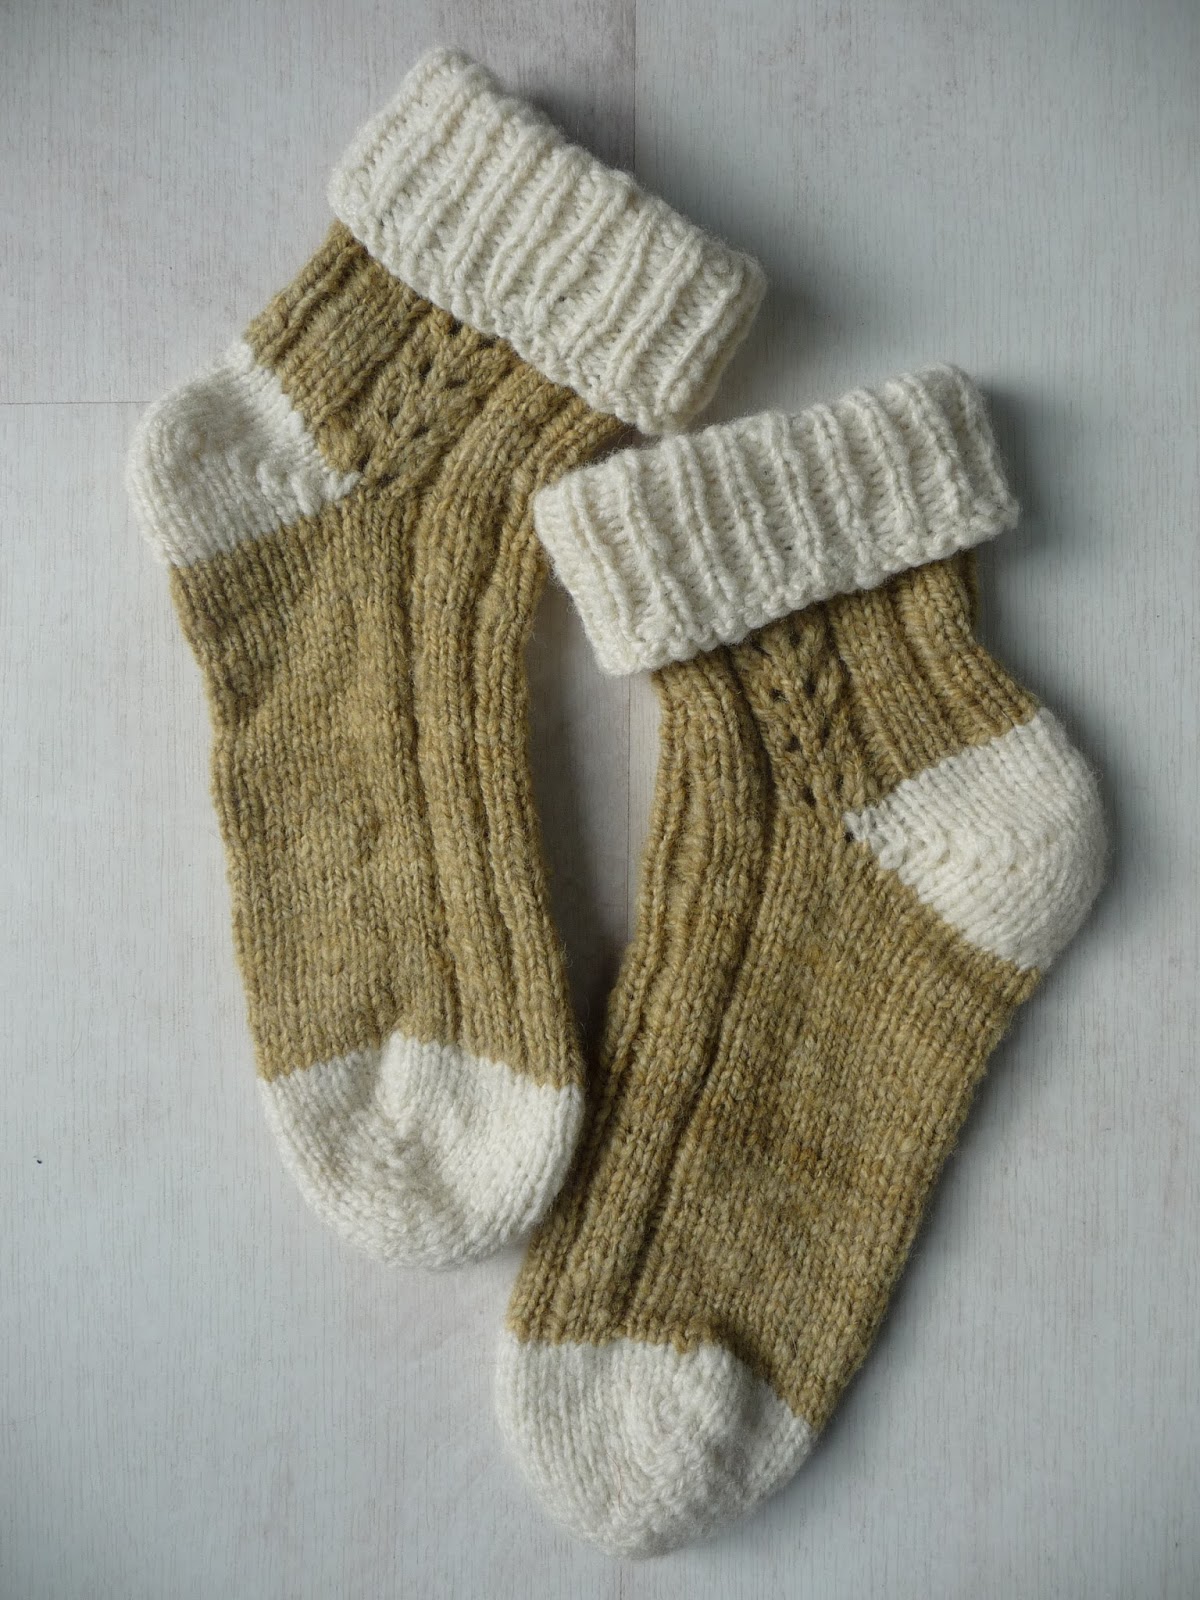
Presently, warm, cosy socks are high on the practical priority list and two balls of Speckled Face Beulah wool, handspun somewhere round aran weight, yardage unknown and one dyed with dried yarrow, were already earmarked for a pair of boot socks. 
Before starting to knit, there is much to enjoy; with notes on history and the origins of sock techniques, this book has an enthusiastic voice and a comprehensive yet concise approach that speaks of a thoroughly informed author.  First, she discusses yarn weights, the qualities of natural and synthetic fibres and even the importance of twist and spin, all of which would have been a revelation to me before I started spinning yarn myself. The next chapter is all about choosing and using needles, with line drawings to show how they work - fascinating, I never imagined using two circular needles on one sock. Chapter Three covers measuring feet, accounting for negative ease and doing knitting maths.  Sadly, it seems there is no shortcut to knitting a tension gauge, gritting your teeth and working out the necessary stitch count.
Racing through the overviews of cuff down and toe up sock anatomy, I reached the basic toe up pattern instructions.   Thanks to the book, I reckoned I now understood how to keep socks perfectly equal by knitting two at once and that working from the toe up, the leg sections could simply become as long or short as my supply of yarn allowed. Working from both ends of each of my centre pull balls, there would be no need to weigh or measure and divide the yarn in advance.   Taking up the challenge to knit socks that fit, I did measure my feet and fill in the table in the book, very grateful that the UK went metric while I was still in school and imagining those poor Americans, trying to work out 10% of eight and three quarter inches to adjust for stretchiness.  Once again, I jostled with Elinor Gotland racing down the stairs to meet the postman, delivering me a second pair of 3.5mm needles and a new long circular cord, to replace the one the dog ate.


Minding the craft shop on a Sunday afternoon, with wind and rain battering the coast, barely any customers came to disturb my attempts to learn provisional cast on and knit a short row toe.  A deficiency particular to paperbacks rapidly became apparent - the book flapped shut and I lost my place every time Elinor got up to stretch her legs. A ring binding would suit hands free reading much better. 

Working the short row toe, Row 2 begins with a yarnover, for which instructions are not listed in the index, though frustratingly, they are mentioned on the following page under the heading Short Rows, with diagrams showing them at the end of a short row rather than the beginning. Puzzling over a miswritten sentence in Row 3, my confidence in the book had fallen considerably by the time I could squish my duck shaped foot into the first completed toe.  

Down to my own cack handedness, using two circular needles did not go well.
"Look out, Beaut, all those stitches are going to end up on the same needle again."
"Aaaargh, curses, sit down Elinor!"  The book fell shut and my companion gave a snort as she read the back cover.
"Not quite 'Foolproof' after all, is it, Beaut?  You didn't need to buy those extra needles, but on the bright side, you're doing ok having
the two socks on one long cord.   I could fancy a pair myself."
Unlikely as it sounds, the short row heel is knitted exactly the same way as the short row toe.  Sat by the fire, instead of perched on a chair in a draughty shop, knitting the heels was as easy as kiss your hand.  Looking at the stitch library in Chapter 10, I even ventured a strip of wide lace rib running up from the ankle.  The instructions were perfectly clear and this feat of daring went without a hitch.  Once the dyed wool ran out, I used up every scrap of the white making a ribbed cuff, delighted to have both socks finished off simultaneously.  So pleased that I launched straight in to spinning up a batt of icelandic sheepswool into chunky yarn to try one of the

alternative styles of toe, best suited to a slipper - the moccasin. No problem there either, so Steve got the thick, croc liner socks he has been angling for. 
This small book really does teach sound principles for making socks from any weight of yarn, it's absolutely ideal for handspinners wondering how to use a couple of random skeins from their stash. There are a good few more toes and heels to try, nine other stitch 
patterns and plenty more techniques. The book comes out in the UK in March 2016 priced at £5.99.
Just imagining how many different socks it has the potential to lead you to, I'd consider this much better value than a stack of individual patterns. 

And do they fit?  
Considerably better than socks I've knitted in the past.


Friday, 5 February 2016

Making Flower Fairies from Wool

"O what can ail thee, business woman, 
Sole Trader, palely loitering?
Looking for fairies, are you?"
I stopped staring at all the brown ferns on the rockery and snapped out of my reverie.
"Well, you know that red one I put in Crafts by the Sea, ready for Valentine's Day?  The first person to spare it a glance said to her daughter, 'Ooooh, look at the pin on that voodoo doll!'"
"Perceptive woman.  Fairies are not cute.  Hang on, I'll get you the poem."
My companion came back out to the garden with Palgrave's Golden Treasury, open at Keats'  'La Belle Dame sans Merci'. 
"A Fairy Affaire - 'Ah, woe betide!
The latest dream I ever dream'd
On the cold hill's side.'
Love 'em and leave 'em, Beaut.  That's fairies for you."
I turned the page and read to the end.
"Mmm, I see.  Fairy lovers get 'honey wild and manna-dew', but when the party's over, they find they've been seriously shafted."
"Right.  There's not much use in anguish moist and fever-dew in this waterlogged garden.  The sedge is wither'd from the lake and it's time you put the kettle on."

Drinking tea in the kitchen, I was still racking my brains for a better Valentine Fairy product. Needlefelting wool fairies from roving was a small commercial success last Christmas and having got the knack of putting them together, I must admit, I really enjoy making them.
 "I was thinking more along the lines of Cicely May Barker and 'Flower Fairies of the Wayside.'  Pretty creatures anyone would love to find hiding among the primrose and the ivy."
Elinor looked at me sideways.
"Well, I wouldn't want them running in and out of my house."
Deciding that fairies and flowers were the key to romance, with only a few sodden crocuses huddling on the lawn, I found these paper flower making instructions online.  They don't say much about how to attach a stem, so I experimented a bit. If you make a little bend in the florist's wire, twist a pinch of wool roving round it to form a centre for the flower, then poke it down through the middle 
before squeezing in the hot glue, that
works nicely. It's the first time I've used a glue gun and the stuff is rock hard when it sets.  I made the Christmas Fairies with a pipe cleaner running down from the head into the body, Flower Fairies can be made just the same way only using a long florist's wire.  Drill some holes in a piece of wood off the wood pile with a 2mm drill bit and the flowers and a fairy can all be firmly arranged as a table centre or ornament.
"No-one would mistake this pink fairy for a voodoo doll now, would they, Elinor?"
"Hmm, I still think you're on dangerous ground, Beaut."
"Oh, surely not, with all these flowers."
Elinor sucked her teeth.
"As an advert for an amour, it might work, but this is no Valentine enticement to settle in for cosy evenings in front of the telly, 2.4 kids and a labrador.  Fairies are powerful and free and nobody's friend but their own."
"Well, I just hope the shoppers in Crafts by the Sea don't see it your way."
"I hope they are careful what they wish for and don't end up like that knight-at-arms, haggard and so woe-begone. Getting their heart's desire rarely does people any good and fairies know that. They live wild and can't bear to be trapped.  You won't find them looking in the Lonely Hearts column."
"I expect they've got up to speed with IT by now.  It's all internet dating, these days."
"Fairies wouldn't bother, they don't want likes on facebook, or even anyone to admire their knitting."
"You reckon?  Come and see what I found at the bottom of the garden."


Friday, 29 January 2016

Spinning Alpaca Tops into Bulky Yarn with a Rainbow Slub and Making a Humdrum Hat

My daughter's warm reception to an offer of knitwear sent me into a frenzy of spinning last week.  As my companion, Elinor Gotland, remarked, cold weather in Scotland had clearly enhanced the appeal of a woolly hat. The last one I made was crocheted in Black Welsh Mountain sheepswool - frankly unappealing, far too itchy, far too brown.  Since himself was going away up to Edinburgh at the weekend, no time for another failure, nor anything too clever, this hat had to be quick to spin and easy to knit.
Alpaca is especially warm, because of its hollow fibres, super soft and a particularly attractive choice when you have a couple of hundred grams of black and white tops from John Arbon sitting on the side, all clean, combed and ready to go.  Spun worsted, the yarn does come out rather dense and heavy.  Hoping for a more bouncy, lofty and funky result, I tried improvising rolags from short lengths of top with little tufts from a rainbow of wool
rolled inside.  Loosely rolled, once I pulled these 'fauxlags' back in a longdraw style, while I did get pleasingly colourful lumps coming through, the alpaca fibres soon started drawing out into their original alignment. Using a big knitting needle to roll the tops
up more tightly against the drag of denim jeans, I could create something nearer to a puni which held the circled fibres better for spinning a semi-woollen yarn.  The spinning went really fast on the 10:1 wheel ratio and though the twist and ply looked moderately firm, the yarn was quite fluffy.  While washing, I dared a hot to cold plunge and a short thwacking of the skeins to felt the strands for extra integrity.  Bit risky with alpaca, but I think I got away with it.  Another time, I'd be more generous with the colour, as a fair amount of rainbow just got hidden inside the spinning.

How to make a Humdrum Hat - the principles


Twist three strands of your yarn together and pick a knitting needle size that looks about the same width as the twist of yarn.  Knit a square in stocking stitch, write down how many stitches you cast on and how many rows you knitted, draw round the square on a piece of paper, then wash it the same way you intend to wash the hat - for me, that is usually a machine wash on the wool cycle, though I did handwash this alpaca.  Reshape while damp, dry flat on a towel.  Put your tension square back on the piece of paper, inside the shape you drew before and see how much it has shrunk in length - this varies madly in my experience, from no change at all to 15% shorter.  Lay a ruler on the square of knitting and count how many stiches in a row fall within 10cm width.  If you can measure the head of the person who will be wearing the hat, run a tape round the widest part from the base of the skull circling the brow, so a custom fit can be calculated.  Knitted fabric is stretchy, to end up snug, an adult hat size can be about 5cm smaller than the head it needs to fit.  I forgot that in my hurry, so my daughter's hat turned out on the large side, but knitwear is forgiving and so is she.

This yarn was bulky, using 6mm needles, the tension came out about 10 stitches to 10cm.  To fit a 56cm head, I cast on 55 stitches (should have been 50, really) using a stretchy, long tail cast on, using a 50cm long circular needle.  Joining to work in the round, it is always a fiddle to make sure there is no twist in the cast on row, but once you have got the first round done, knitting round after round is the easiest, quickest knitting there is.

Stocking stitch will naturally curl up on itself.  As you knit the tube, allow the work to curl up into the width of hat brim you want, then carry on knitting til the length from the fold at the bottom of the brim equals the distance from your earhole to the point on the side of your head where the skull slopes in steeply toward the crown.  If your tension gauge shrank in the wash, carry on knitting til the work is proportionately longer.  
Shaping the crown to match the shape of a head, strictly speaking, the gradient gets steeper the nearer you get to the top.  
There are lots of methods for making neat reduction patterns, but in principle, you just need to reduce the diameter roughly 4 - 5 stitches every row.  In a finer wool, this might work best reducing 8 or 10 stitches in one round then knitting a plain round or two before reducing again.  Keeping it simple, in bulky wool, knit round reducing your total stitch count to a multiple of 5 by knitting two together here and there.  Since I started with 55 stitches, easy peasy, just place a stitch marker every 11 stitches. Every time you reach a marker, knit two together.  As the diameter gets smaller, it gets harder to use the circular needle cord smoothly, so I switch to using magic loop.  

Once there are only two stitches between each marker, break the yarn, put the tail on a darning needle and thread it through the stitch loops, taking off the markers. Pull tight and fasten off. This is the first pompom I have made in ages.

Friday, 22 January 2016

Spinning Alpaca Tops and Knitting Socks

Yarn marketed as sock wool generally contains nylon.  I believe the nylon is added to increase durability and never mind its sweaty side effects.  Madness. Of all life's little luxuries, warm, dry, comfy feet rank very highly with me and having lived in Wellies for months, I'd say nothing beats 100% wool, except, of course, 100% alpaca.  I met some alpaca lately and noticed their fleece seemed to be standing up ok to the wet and muddy conditions.  
In my grand January exacavation of stashed fibres, I rediscovered these black and white alpaca tops from John Arbon.  Spun worsted straight off the end of the strip with a decent amount of twist, even pure alpaca yarn ought to be reasonably durable.  John Arbon sells fantastic socks and though the ones without nylon are marketed as bedsocks, my husband had a pair he wore all day. They haven't worn out, but since an accidental hot machine wash, I now wear them.
Feeling guilty about this, I knitted him another pair, taking care to be generous with the size, in case of future shrinkage.  After all the coarse, bulky stuff I've been churning out lately, it was a great pleasure to be spinning double knitting weight with luxury fibre, though of course, knitting the finer yarn into socks has been comparatively time consuming.
My companion, Elinor Gotland, gave himself John Arbon alpaca socks for Christmas. When I came in to the kitchen after a long cold morning out on a friend's farm, finding her giving both pairs a hoof wash in the sink was disquieting on a number of counts. 
"Steve said that my hand knit socks felt amazingly light and warm."
"After seeing you fiddle about turning heels, missing all the subtitles on your French telly series, he's hardly going to point out they're a bit loose, Beaut.  Actually, they feel quite flimsy to me.  I don't suppose they'll last."
I sat down heavily and eased off my Wellington boots.
"I suppose you think I should have bought some nylon riddled sock yarn?"
"Keep your hair on.  There's tea in
the pot.  How did scanning the Speckled Face Beulahs go?"  
"Oh excellent, only three were empty out of 95 ewes, mostly they are expecting twins with 14 sets of triplets."
"I'll bet Mary was pleased with that, especially after the trouble they had with those two new rams escaping.  Must have had plenty of energy left."  Elinor laughed her raunchiest laugh.
She made quite a play of stripping off her rubber gloves while I drank my tea. Still, credit where it's due, she's being remarkably helpful.  I hate hand washing.
"Thanks for doing those socks.  I might knit myself a pair, ready for lambing in March."
"I'd think about blending in some long wool if you must use alpaca.  Strong, fine wool fibres might be as tough as nylon and less cheesey feet."
"Adding in some Gotland fleece, you mean?"
"Or Wensleydale.  Better still, knit yourself some proper sheepswool boot socks."
"Oo, I know I've got some woolen spun Beulah stashed somewhere.  If only I could remember where I put it."

Friday, 15 January 2016

The Macduff Bag Crochet Pattern

I first made this bag using yarn spun by a friend of a friend, from the fleece of her sheep up in Swansea. Doesn't look much, but the qualities of handspun wool and the colours it turned during my early plant dye experiments strongly appealed to me.  Though most of the colour has long ago faded and the handles have stretched, it is still in everyday use. To my mind, that bag launched my present life and it has certainly survived a thousand trips.  Making another from recycled balls of heavy superbulky yarn from the Huxtable jumper was a way of keeping my own first handspun wool in use and hopefully, creating a better advert for my new status as sole trader of Rich & Strange Silk and Wool Work. 

Crocheted up by eye, more by luck than judgement, this shape of bag in durable wool has turned out highly functional. With the handles over one shoulder, it tucks comfortably under the elbow, as shown in this photo of one I made for my friend BG. When in a crowd, I bring mine forward, so the purse and phone pockets sit securely against the side of my waist. Packed with shopping, it is remarkably capacious and sturdy enough to carry pints of milk and bags of potatoes.  Once full, I  just hold the two handles in my hand and let the weight of the bag hang down.  The one below, which I made for my sister, in Herdwick wool, shows the basic bowl shape.  Having just made two more, this time, I have written out the pattern.

Macduff Bag Crochet Pattern


Materials
~300m heavyweight, durable superbulky yarn (5-6 wpi)
15m strong aran yarn
6mm and 3mm crochet hooks
This simple pattern is easy to adapt to any thickness of yarn and hook size, just make sure it is a good strong, dense yarn, as smooshy merino puff won't last long in service.
My tension came out at 10 dc stitches and 11 rows to 10cm squared.
Bag size ~ 94cm diameter, 18cm deep
ch = chain stitch
dc = UK double crochet/US single crochet
Method
Start with a magic ring, 8 dc into ring and slip stitch into first chain to close the circle. (8)
Every round hereafter should begin with a chain stitch, into which you place a crochet stitch marker (such as a safety pin).  Close each round with a slip stitch into this marked stitch, which also counts as the first dc of each round.

To make a saucer shaped base, dc into every stitch, putting two dc into some of the stitches in the following frequency:
1.  2dc into every second stitch (12)
2.  2dc into every second stitch (18)
3.  2dc into every third stitch (24) 
4.  2dc into every fourth stitch (30)
5.  2dc into every fourth stitch, which leaves 2 stitches at the end for one dc each (36)
6.  2dc into every fifth stitch, which leaves 1 stitch at the end for one dc (43) 
7.  2dc into every sixth stitch, which leaves 1 stitch at the end for one dc (50)
8.  2dc into every seventh stitch, which leaves 1 stitch at the end for one dc (57)
9.  2dc into every eighth stitch, which leaves 1 stitch at the end for one dc (64)
10. 2dc into every tenth stitch, which leaves 4 stitches at the end for one dc (70)
11. 2dc into every eleventh stitch, which leaves 4 stitches at the end for one dc (76)

The outer edge of the circle should be beginning to curl upward at this point.  If you are using a thinner yarn or want a bigger bag, just carry on adding 6 or seven stitches to each round until you get the base size you want, before steepening the upward curve by adding fewer stitches to the next few rounds. For this bag, add three stitches to the next six rounds as follows:

12. 2dc into every twenty fifth stitch, which leaves 1 stitch at the end for one dc (79)
13. 2dc into every twenty sixth stitch, which leaves 1 stitch at the end for one dc (82)
14. 2dc into every twenty seventh stitch, which leaves 1 stitch at the end for one dc (85)
15. 2dc into every twenty eighth stitch, which leaves 1 stitch at the end for one dc (88)
16. 2dc into every twenty ninth stitch, which leaves 1 stitch at the end for one dc (91)
17 2dc into every thirtieth stitch, which leaves 1 stitch at the end for one dc (94)

For the next eight rounds, there is no further increase as the sides of the bag go straight up.  Add more rounds for a deeper bag.  To draw the top edge of the bag gently inward, on the next round, decrease three stitches, evenly spaced around the circumference like round 17 in reverse, then crochet a plain round, reduce three more stitches like round 16 in reverse, then crochet a plain round, reduce three more stitches like round 15 in reverse and finish with two plain rounds.  Break off yarn leaving a metre long end to sew the edge.  You can use the front or the backs of the stitches showing at the outside of the bag, as you prefer.  If using the neater front as the outside, roll the top round of stitches outward and sew them against the round below to create a rounded edge.

The bag handles are formed from one length of crocheted cord.  There are lots of options for making a cord, I think this spiral is the simplest.
Make a starting loop and chain 5 stitches, slip stitch into the first stitch to join.  Make one dc into each of the five chain stitches and carry on puting a dc into the outer thread of each dc stitch, round and round, endlessly spiralling upwards.  
For this bag, 170cm cord made my preferred size, pin your cord onto your bag and judge your handle length for yourself.


Place one end of the cord at the centre of the base.  Using the aran yarn and the 3mm crochet hook, push the hook through any loop on the cord, then through the front of a stitch on the bag and draw up a loop of aran yarn to the surface, keeping the other end of this yarn held hidden underneath the handle.  This will leave a chain of aran loops visible along each side of the cord, it's a fiddle at first, keep the loops large, it goes quicker once you have the hang of it.  Work along one side of the cord to the  top edge of the bag, across the width of the cord and down the other side, back to the centre of the base of bag.  Now place the other end of the handle at the centre point and crochet that against the opposite half to make one straight line.  Hold the bag up by this long single loop and find the middle.  With the bag upside down, pin the midpoint of the handle to the centre of the base of the bag, so that there is a handle loop on either side.  Crochet on the cord to make a cross shape at right angles.

Now double crochet oblong shapes to make pockets the size of your purse and your phone and sew them inside the bag, between the handles on opposite sides.  

Putting the bag through a 40 degree cotton wash cycle in the machine will felt it a little and even it out a lot.  The two bags in the photo show how the crocheted wool looks before and after the wash.  While it is damp, stuff the bag firmly with rolled towels to establish a nice round shape while it dries.
I have called my new bag Macduff, since its mid brown yarn was untimely ripp'd from a barely worn Jacob X Texel jumper with the dark brown yarn also ripp'd from another misguided project, a Black Welsh Mountain woolen hat that itched.  My Macduff came with me to the bank to discuss setting up a business account and its partner is now up for sale at Crafts by the Sea.